
Nik Sharma's Blog
December 12, 2022
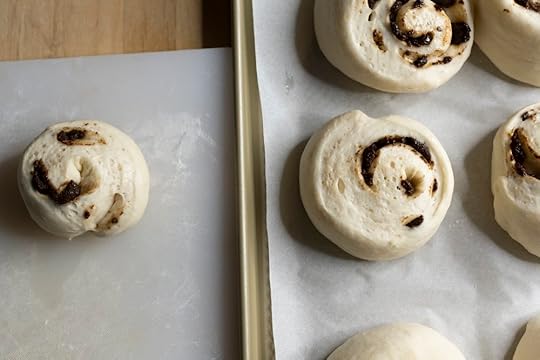
Perfect Pillowy Cinnamon Rolls
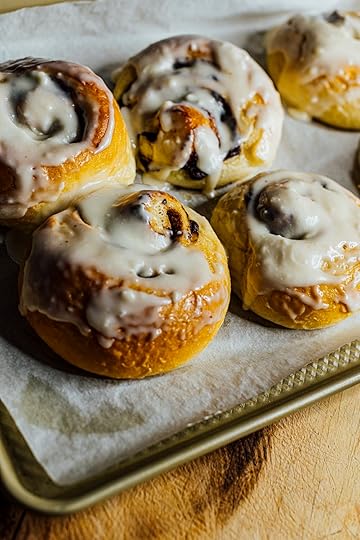
Perfect Pillowy Cinnamon Rolls
Cinnamon rolls are a staple at our home during Christmas week and on Michael's birthday, which also happens to fall in December. This is one of the best recipes I've made and comes from King Arthur Baking Company and was also their recipe of 2021. The rolls get their soft pillowy texture from the tangzhong technique, which relies on hydrating starch in flour to create a softer textured bread. The tangzhong method is used for yeast-leavened breads and owes its origins to a Japanese method of bread-making called yudane/yukone that author Yvonne Chen popularized across Asia.
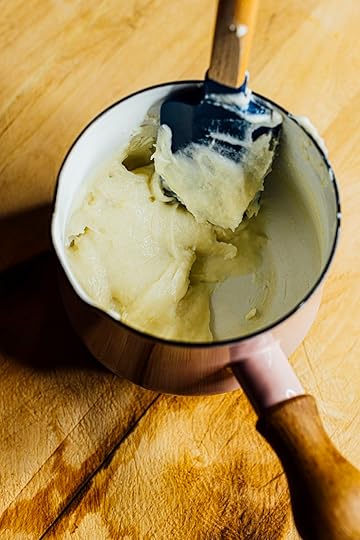
In the tangzhong method, a small quantity of flour is mixed with milk and cooked until it thickens to form a thick paste. The starch in the flour hydrates, and in the presence of heat, gelatinizes to form the paste. This mixture is then mixed with the remaining flour and ingredients used to make the bread, and the result is puffier and softer bread. This method works great in cinnamon rolls, and I've used it since I learned of it. The new King Arthur Baking Company cookbook, Baking School, also includes this recipe (and makes an excellent holiday gift for a baker).
Perfect Pillowy Cinnamon Rolls
adapted from The King Arthur Baking School: Lessons and Recipes for Every Baker, Countryman Press, October 2022


'Who doesn’t love cinnamon rolls? There’s a good reason this fragrant recipe was chosen as our Recipe of the Year in 2021. It’s a great illustration of the benefits of the tangzhong method, resulting in the most tender rolls you can make, with a shelf life that keeps them delectable for days. Used more commonly in enriched doughs, this technique—which has origins in Japan’s yukone (or yudane)—cooks a small percentage of the flour and liquid very briefly before combining the resulting thick slurry with the remaining ingredients. We use bread flour instead of all-purpose flour because of its higher protein content, which allows it to absorb more liquid without diluting the structure of the gluten strands. The more liquid in your dough, the softer it will stay for longer, which you’ll notice in these incredibly pillowy rolls that won’t go stale quickly like regular ones.' - King Arthur Baking Company.
Makes 8
For the Tangzhong
1/2 cup/119 g whole milk
3 Tbsp/23 g unbleached bread flour
For the Dough
2/3 cups/159 g whole milk
2 1/2 cups/300 g unbleached bread flour, plus more for dusting
2 Tbsp/25 g granulated sugar
1 tsp fine sea salt
2 tsp instant yeast
4 Tbsp/57 g unsalted butter, softened
For the Filling
1 Tbsp unsalted butter, melted, plus 21 grams (1½ Tbsp) for brushing
½ cup/107 g brown sugar
2 Tbsp unbleached bread flour
3 to 4 tsp/8 to 10 g cinnamon
pinch of fine sea salt
For the Icing
1½ Tbsp/21 g melted unsalted butter, divided
½ tsp vanilla extract
1½ cups/170 g confectioners’ sugar
pinch of fine sea salt
1 to 2 Tbsp/14 to 28 g, milk, enough to thin to desired consistency
For the Tangzhong
Combine the milk and flour in a small saucepan, and whisk until no lumps remain.
Place the saucepan over medium heat and cook the mixture, stirring frequently, until thickened and pastelike; the whisk should leave lines on the bottom of the pan. This will take 1 to 3 minutes, depending on the strength of your burner.
Remove from the heat and transfer to the bowl of a mixer.
For the Dough
Immediately add the dough ingredients to the mixer bowl in the order listed. The heat from the tangzhong will help warm the cold milk.
Using the dough hook, mix on low speed to bring the dough together, then increase the speed to medium-low and continue to mix until the dough is smooth and elastic. This should take about 10 to 12 minutes.
Shape the dough into a ball, place it back in the bowl, and cover.
Let the dough rise until puffy but not necessarily doubled in bulk—about 60 to 90 minutes depending on the warmth of your kitchen.
For The Filling
While the dough is rising, combine the melted butter with the remaining filling ingredients, stirring until the mixture is the texture of damp sand. Set aside.
Lightly grease a baking sheet or line it with parchment.
For the Assembly and Baking
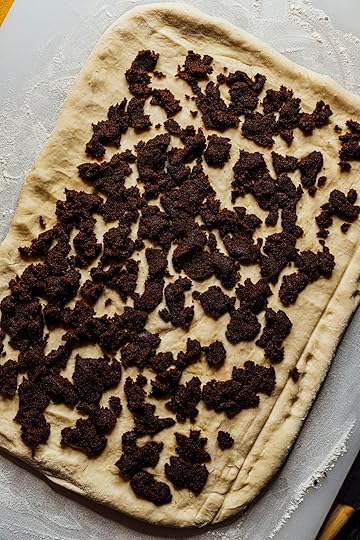
Transfer the dough to a lightly floured work surface and press it into a 10 in by 12 in/25 cm by 30.5 cm rectangle about 1/2 in/12 mm thick.
Sprinkle the filling over the dough, covering all but a 1/2 in/12 mm strip along one long side.
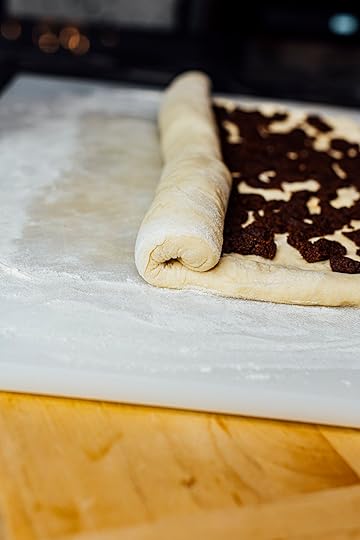
Starting with the filling-covered long side, roll the dough into a log. Pinch the seam together to seal.
Using a serrated knife or dental floss, cut the dough into eight rolls, about 1 1/2 in to 2 in/4 cm to 5 cm each.
Place the rolls onto the prepared baking sheet, spacing them at least 2 in/5 cm apart; a 3-2-3 arrangement works well. To prevent them from unraveling while they rise and bake, tuck the ends of the spirals underneath the rolls to hold them in place.
Cover the rolls with lightly greased plastic wrap and let them rise for 30 to 60 minutes. The rolls should be puffy, and the dough shouldn’t bounce back immediately when gently pressed.
Preheat the oven to 375F/190C with a rack in the top third.
Uncover the rolls and bake them for 14 to 18 minutes, until they’re a very light golden brown.
Remove from the oven and brush the hot rolls with the remaining 1½ Tbsp/21 g of melted butter. Let cool for 10 to 15 minutes before icing.
For the Icing
In a medium bowl, combine the icing ingredients, mixing until smooth.
Ice the rolls and serve immediately. If you’re planning to serve the rolls later, wait to ice them until just before serving. Store icing at room temperature, tightly covered, until ready to use.
Let the rolls cool completely before wrapping tightly in plastic wrap or placing in an airtight container.
VARIATIONS:
Add any of the following to the filling: ½ teaspoon orange zest; ½ cup/85 g mini chocolate chips; 1/2 cup/75 g dried cranberries or raisins; or ½ cup/57 g chopped pecans, walnuts, or nut of your choice. You can also substitute other ground spices for the cinnamon in the filling. We recommend reducing strongly flavored spices, such as nutmeg or ginger, to ½ tsp.
Advance Prep
Students often ask whether they can shape these rolls the night before, then bake them the next morning. Because of the tangzhong method, we recommend making and baking the rolls in advance, since they’ll stay wonderfully soft for at least 3 days (you can bake them up to several days in advance, then store tightly wrapped and uniced at room temperature). When ready to serve, lightly cover the rolls with foil and warm them in a 300F/150C C oven for 5 to 10 minutes, until warmed through. Ice and enjoy. We guarantee they’ll be just as delicious as those that were freshly baked.
Cream Cheese Icing
Omit the milk and use 4 to 6 Tbsp/57 to 90 g softened cream cheese. The softer the cream cheese, the easier it will be to incorporate. If the icing is too thick to spread easily, add milk (1 tsp at a time) to get the consistency you want.


December 5, 2022
Thumbprint Cookies

Thumbprint Cookies
The best part about thumbprint or jam drop cookies is how fun they’re to make and how unfussy the entire process is. No cookie cutters, just a thumb to make a well in the cookie dough. My policy on the choice of fillings, use whatever makes you the happiest.
The Cook’s Notes
It’s best to let the dough rest overnight in the refrigerator for a crispier texture.
For the cookie filling, use whatever jam you love and a seedless variety for berry-based jams like raspberry and blackberry (many people find the texture of the seeds annoying). Fruit curds like lemon, lime, orange, and passion fruit are excellent options, as well as gianduja and other chocolate-based spreads.
Makes approximately 24 to 25 cookies
4 oz/115 g unsalted butter, cubed and softened to room temperature
¼ cup/50 g sugar
1/8 tsp fine sea salt
1 ½ cups/210 g all-purpose flour
1 large egg, lightly whisked
1 tsp vanilla extract
¼ cup demerara sugar
¼ cup seedless jam, chocolate spread, or fruit curd
Place the butter and sugar in the bowl of a stand mixer and beat over medium-high speed until pale yellow and creamy, 2 to 3 minutes. Scrape down the sides of the bowl. Add the salt and all-purpose flour and beat over low speed until the mixture turns into a coarse crumbly mix. Scrape the sides of the bowl down. Add the egg and vanilla and mix over medium speed until it forms a smooth and pliable dough, about 1 minute. Scrape the sides of the bowl down and transfer the dough to a bowl. You should have about 14 ½ oz/415 g of cookie dough. Cover with a tight lid or cling film and let refrigerate for at least 4 hours, preferably overnight.
When ready to bake, preheat the oven to 350F/180C. Line two baking sheets with parchment paper. Place the demerara sugar in a small mixing bowl. Take 1 Tbsp of the dough (about 18 g), and using the palms of your hands, shape into a small ball. Toss the ball in the demerara sugar to coat evenly. Place the ball of dough onto the lined baking sheet. Press gently with your thumb to form a small well. The well should not pass through the bottom. Prepare the remaining cookies and space them 1.5 in to 2 in/2.5 cm to 5 cm apart from each other on the sheets. Bake the cookies in the oven for 20 minutes, until they turn golden brown on the edges, rotating the sheets halfway through during cooking. Let the cookies cool on the baking sheet for 5 minutes, then transfer them to a wire rack to cool completely. Transfer to an airtight container and store in the freezer for up to 2 weeks.
When ready to serve, fill the cookies with jam, chocolate spread, or fruit curd. If the cookies are frozen, thaw them to room temperature before filling them, and using two teaspoons, spoon in just enough filling, about 1 tsp, into the well of each cooled cookie. Serve the cookies and eat within a few hours of preparing them.
November 28, 2022
Pumpkin Raita
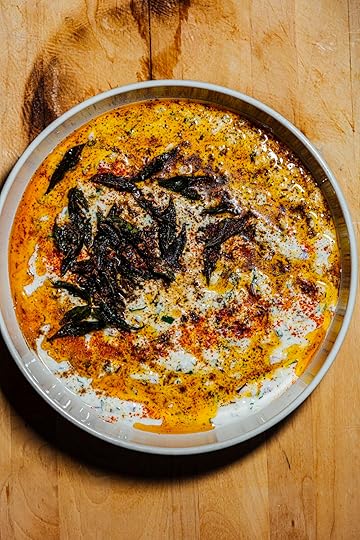
Pumpkin Raita
During the fall and winter months, I look forward to a bowl of this cooling spiced pumpkin raita. Serve it as a side with a warm stew or curry and some rice or flatbread. Make a big bowl because it disappears quickly.
The Cook’s Notes
If you use Greek yogurt, add 1 ¼ cup/ ml of chilled water to every 1 cup/240 g of Greek yogurt.
Butternut squash can be used in place of pumpkin.
If you don’t have Kashmiri chilli powder, use this substitution: ¾ tsp ground smoked sweet paprika and ¼ tsp ground cayenne.
Makes 4 to 6 servings
For the Raita
2 cups/about 400 g grated pumpkin
2 cups/480 g plain unsweetened yogurt
1 cup/240 ml chilled water
2 Tbsp fresh lemon or lime juice
2 shallots/120 g, minced
¼ cup/ g fresh cilantro both tender stems and leaves, chopped
2 Tbsp fresh mint, chopped
Fine sea salt
Ground black pepper
For the Tadka
2 Tbsp vegetable oil with a high smoke point such as grapeseed
1 tsp black mustard seeds
1 tsp cumin seeds
1 tsp Kashmiri chilli powder plus extra for garnishing
10 to 12 curry leaves, dried or fresh
1 tsp ground chaat masala (see Notes) homemade or store-bought
Place the grated pumpkin in a microwave-safe bowl, cover with a microwave-safe lid, and microwave for 3 to 4 minutes and 30-second intervals until the pumpkin is completely tender. Keep aside to cool.
In a large mixing bowl, whisk the yogurt, water, and lemon juice until smooth.
Fold in the cooked pumpkin, shallots, cilantro, and mint—taste and season with salt and pepper.
When ready to serve, prepare the tadka. Heat the oil in a small saucepan over medium heat. Add a single mustard or cumin seed to the oil; if it is hot, the seeds will sizzle. Add the mustard and cumin seeds, followed by the curry leaves, and cover with a lid. The oil will start to spurt. Swirl the oil in the saucepan for a minute and remove from the heat. Immediately, add 1 tsp of Kashmiri chilli powder. Swirl and pour the hot mixture over the yogurt in the serving bowl. Garnish with a sprinkling of chaat masala and Kashmiri chilli powder and serve immediately. Leftovers can be stored in an airtight container for up to 3 days in the refrigerator.
November 25, 2022
Leftover Turkey Tacos
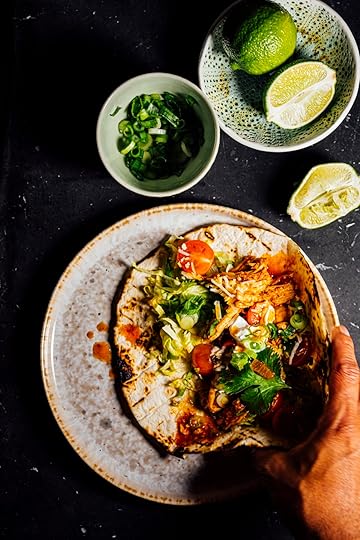
Leftover Turkey Tacos
I’ve never needed an excuse to make tacos, and I’ll undoubtedly find a way to eat them once a week. Thanksgiving and the days following it are no exception. This is a very simple turkey taco recipe that’s quick to put together. Feel free to use whatever fixings you love to add to your tacos. This will also make a fantastic taco salad.
The Cook’s Notes
Whole-dried Kashmiri chillies can be found online or in Indian grocery stores. It carries mild heat and gives the turkey a brilliant red color and gentle smokiness.
Four servings
2 Tbsp extra-virgin olive oil
½ cup/75 g diced onion
4 garlic cloves, grated
1 tsp ground cumin
½ tsp ground chipotle
2 large whole Kashmiri chillies (optional), torn
¼ cup/60 g tomato paste
1 lb/455 g shredded leftover cooked turkey
1 cup/240 ml low-sodium chicken stock
2 tsp dried oregano
2 Tbsp fresh lime or lemon juice
Fine sea salt
Heat the oil in a medium saucepan or skillet over medium heat. Add the onions and sauté until soft and translucent, 4 to 5 minutes. Add the garlic, cumin, chipotle, and Kashmiri chillies. Cook for 1 minute, until fragrant. Stir in the tomato paste and cook until it starts to brown, 6 to 8 minutes.
Fold in the turkey and chicken stock. Cook over low heat, until about ¼ cup/60 ml of liquid is left behind, 15 to 20 minutes. Stir in the oregano, lime juice, taste, and season with salt. Use the turkey in your tacos. Leftovers can be stored for up to 4 days in an airtight container in the refrigerator.
November 19, 2022
Roasted Delicata Squash with Gochujang

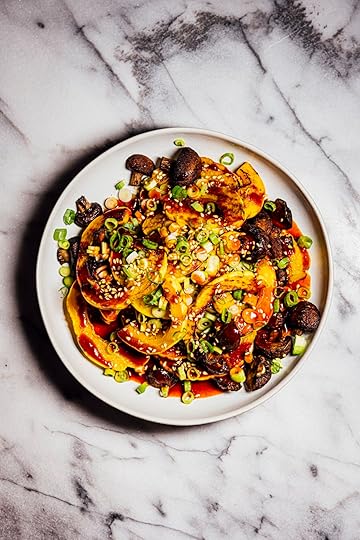
Roasted Delicata Squash with Gochujang
Vegetables like the winter squashes that are naturally sweet benefit from roasting, a little bit of heat, and savory. You can use any winter squash in this recipe; my preference is delicata because the skin is thin enough to eat and skips the need to peel. As the squash and mushrooms roast, their flavors concentrate and stand up against the sweet and spicy flavors of the gochujang sauce. I love eating this with a bowl of plain hot rice, but this is also an excellent side for any fall or winter celebration.
The Cook’s Notes
If you don’t have ponzu at home, use 2 tsp low-sodium soy sauce and ½ Tbsp fresh lemon juice, and ½ Tbsp fresh orange juice. This is not a perfect substitute but will provide some of that citrus flavor and umami.
Makes 4 servings as a side
1 ½ lb/680 g delicata squash
1 Tbsp extra-virgin olive oil
6 oz/170 g crimini mushrooms, halved lengthwise
Fine sea salt
2 Tbsp gochujang
2 Tbsp Chinese black vinegar or malt vinegar
1 Tbsp ponzu
1 Tbsp toasted sesame oil
3 scallions, ends trimmed and discarded, both white and green parts, thinly sliced
1 Tbsp toasted sesame seeds
Preheat the oven to 350F/180C.
Line a baking sheet with parchment paper.
Trim the squash and cut in half lengthwise. Hollow each half out with a spoon to remove and discard the seed. Cut the squash halves into ⅜ in/1 cm thick crescents and place them on the baking sheet with the mushrooms. Drizzle with olive oil and season lightly with salt. Arrange in a single layer on the sheet and roast in the oven until the squash is tender and golden brown, 25 to 30 minutes. Remove from the oven and transfer to a serving dish.
While the vegetables roast, prepare the sauce. In a medium mixing bowl, combine the gochujang, vinegar, ponzu, and sesame oil.
Top the roasted vegetables with the gochujang sauce, garnish with scallions and sesame seeds, and serve hot or warm. Leftovers will stay good for up to 3 days if stored in an airtight container in the refrigerator.
November 17, 2022
Creamed Corn and Oyster Mushrooms
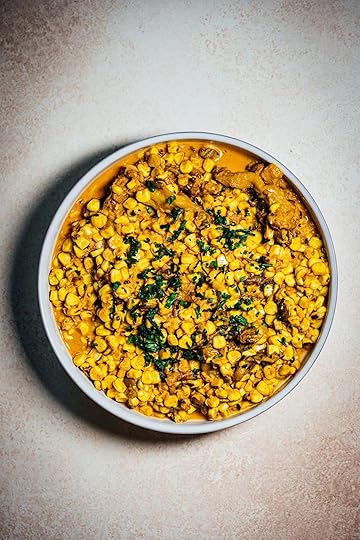
Creamed Corn and Oyster Mushrooms
"Saucy or Brothy" that's how I classify people who love creamed corn. I'm somewhere in between, and the recipe is written as such. However, if you prefer it saucier or soupier, adjust the simmer time to your preference. The richness of coconut milk gives this vegan version of creamed corn a silky-smooth texture that's comforting.
Tip: You can make this 1 to 2 days ahead of time, reheat it before dinner, and garnish it just before serving.
The Cook’s Notes
You can use roasted frozen corn to save on time. If you want to do it from scratch, you’ll need 4 ears of sweet corn. Brush them with a little olive oil and roast them directly over a grill or in a cast-iron skillet over medium-high heat until the kernels start to char, turning them with a pair of kitchen tongs, 10 to 12 minutes. Remove the cobs and let them rest until they’re cool enough to handle. Strip the kernels off the ears using a knife and discard the cob. You should have about 1 lb/455 g kernels.
You don't need to stick to oyster mushrooms, but if you switch to another mushroom, adjust your cooking time accordingly.
I prefer Mexican Oregano in this recipe because it's got a more robust flavor, but any type of oregano will work here.
My favorite coconut milk is Aroy-D. The flavor is simply the closest thing to fresh coconut milk extracted.
Makes 4 to 6 servings as a side
2 Tbsp extra-virgin olive oil
8 oz/230 g oyster mushrooms
1 lb/455 g sweet corn kernels, preferably roasted (See The Cook’s Notes)
2 garlic cloves, grated
1 tsp ground smoked sweet paprika
½ tsp ground turmeric
½ tsp ground chipotle
2 Tbsp fresh oregano, chopped (Mexican oregano works well in this recipe)
1 cup/240 ml full-fat plain unsweetened coconut milk
Fine sea salt
2 Tbsp chopped chives
Heat the oil in a 12 in/30.5 cm stainless-steel skillet over medium-high heat. Add the mushrooms, sprinkle ¼ tsp fine sea salt, and sauté until the mushrooms turn plump and lightly browned, 3 to 4 minutes.
Fold in the sweet corn, garlic, paprika, turmeric, chipotle, and oregano and sauté until fragrant, 30 to 45 seconds. Stir in the coconut milk, reduce heat to a simmer, and cook until the mixture is saucy but not brothy (about ¼ cup/60 ml of liquid should be left behind), 4 to 5 minutes. Taste and season with fine sea salt. Transfer to a serving bowl and garnish with the chives. Serve warm.
Pommes Anna/Potato Galette

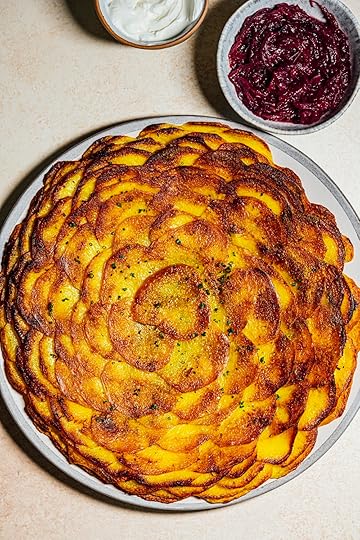
Pommes Anna/Potato Galette
Whether you call it a pommes anna or a potato galette, this is one of the most glamorous ways to eat potatoes. Thin slices of potatoes are layered slightly overlapping each other to form a coil that turns crispy as it cooks in fat. I love to serve this on holidays and special occasions as an appetizer with bowls of sour cream and tangy, fruity guava onion jam to cut through the richness of the potatoes.
The Cook’s Notes
Besides duck fat, ghee, schmaltz, and bacon fat are good choices. I’ve used extra-virgin olive oil, but the results aren’t as lovely as the others; the potatoes can stick to the skillet's surface. Butter tends to burn because it contains milk solids, so I don’t use it.
The lemon juice is used to prevent the browning of the cut slices of potatoes. 1 tsp of citric acid crystals in 4 ½ cups/1 L of cold water will also work.
A mandoline will give consistently thin slices of potatoes. These gloves are great for keeping your fingers safe.
The turmeric used here is not for flavor but instead color. Resist the urge to add too much.
Duck Fat Potato Galette
Makes 8 servings as a side
¼ cup/60 ml fresh lemon juice
4 ½ cups/1 L chilled water
2 lb/ g large Russet potatoes, peeled
¼ cup/60 ml duck fat, melted
1 Tbsp plus 1 tsp cornstarch
4 garlic cloves, grated
½ tsp ground turmeric
Fine sea salt
1 Tbsp chopped chives
Serving Suggestions
Sour cream
Guava Onion Jamable.com/home/guava-onion-jam
Mix the lemon juice with the water in a large mixing bowl. Using a mandoline, cut the potatoes into 1/8 in/4 mm slices. As the potatoes are sliced, quickly submerge them in the lemon water to prevent them from browning. Layout two large lint-free kitchen towels on the kitchen counter. Swirl the potato slices in the lemon water to eliminate any excess starch. Remove the potatoes, shaking them to get rid of any excess water, and lay them out in a single layer on the kitchen towels. Let them air dry, about 30 minutes. Transfer the potato slices to a dry large mixing bowl.
Preheat the oven to 425F/220C.
Take a 12 in/30.5 cm cast-iron skillet. Add 2 tsp of the melted duck fat and 1 tsp of cornstarch to the skillet, and brush the mixture to coat well.
Heat the remaining duck fat in a small saucepan over medium heat. Add the garlic and turmeric and cook for 30 seconds, until fragrant. Remove from the heat and the mixture over the potatoes in the mixing bowl. Add the 1 Tbsp of cornstarch and season well with salt. Fold carefully to coat the potato slices.
Starting from the center, layer the potatoes, lightly overlapping each slice over the other in a circular coil or snake-like pattern. Continue until all the potatoes are used, and the entire pan is covered. Heat the skillet over medium heat, undisturbed, until the potatoes begin to sizzle, 3 to 4 minutes. Remove from the heat. Carefully place a sheet of foil on top of the potatoes taking care not to disturb the layer. Place an 8 in or 9 in/20 cm to 23 cm circular cake pan over the foil and fill the pan with pie beads. Carefully transfer the skillet to the oven and roast until the potatoes are crisp and golden brown along the edges, 45 to 50 minutes. Once cooked, remove the skillet from the oven. Carefully remove the cake pan and peel the foil off the hot potato layer to avoid displacing the potatoes. Let the potatoes sit in the skillet undisturbed for 20 minutes.
Run a silicone fish or an offset spatula along the edges of the potato galette to help release it from the sides. Using the spatula, check to see if the galette base is entirely free from the skillet; if it appears stuck, gently nudge it to loosen using the spatula. Invert a serving plate over the skillet, hold it and the place tight together and carefully flip them over. Garnish with chives. Cut into wedges and serve warm or at room temperature with sour cream and guava onion jam.
The potato galette can be made a day ahead, warm at 200F/95 C before serving.
November 16, 2022
Guava Onion Jam
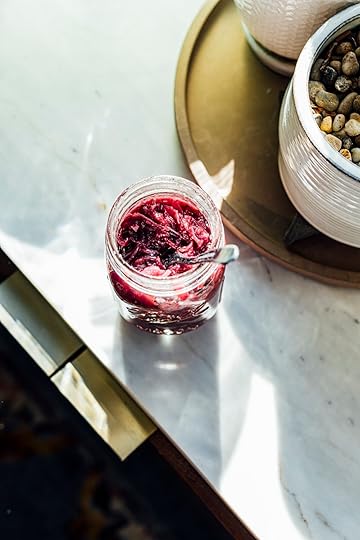
Guava Onion Jam
I don’t see onion jam on restaurant menus enough, and I think it is one of those condiments that should be made more often. A big spoonful of onion jam over pizza, savory tarts and pies like a potato galette, and roast or barbecue meat is irresistible. This onion jam has fruity notes from the guava paste mingled with the sweet and tangy flavors of the bright red onions. I first braise the onions in their own liquid and then cook them at very low heat until they transform into a soft jammy spread.

The Cook’s Notes
I know this sounds counterintuitive but DON’T let the onions caramelize. Cook them until most of their water is released and evaporated. This will help create a more tender and pulpy jam.
I find guava paste gives a more robust fruit flavor than guava preserves or jam in this recipe.
The success of this recipe depends on using the slowest cooking setting possible. It allows the fructans (the polymers of fructose inside the onions) to hydrolyze and release their sweetness.
Do not use a very wide saucepan or saucier. That will increase the evaporation rate and cause the onions to dry out faster than they should, increasing the risk of caramelization. I used this 10 in/25 cm wide 3 qt/2.8 L saucier from Made In.
Nigella seeds are a must in this onion jam.
Makes 2 cups/600 g
2 Tbsp extra-virgin olive oil
1 tsp nigella seeds
3 large red onions, halved and thinly sliced
Fine sea salt
¼ cup/60 ml apple cider vinegar
4 oz/ g guava paste, cut into small pieces
2 Tbsp sugar
Ground black pepper
Heat the olive oil in a medium saucepan or saucier over medium-low heat. Add the nigella seeds and cook until fragrant, 30 to 45 seconds. Fold in the onions, cover with a lid, and cook covered for 4 minutes. Remove the lid, reduce the heat to the lowest setting, and cook, often stirring, until the onions are tender, 18 to 20 minutes. The onions should be relatively dry but not caramelized; they should look pinkish purple.
While the onions cook, mix the vinegar, guava paste, and sugar in a small saucepan and heat over medium heat until the vinegar starts to bubble. Remove from the heat and mix until the guava paste is completely combined with the liquid and there are no lumps. Pour the mixture into the onions and cook, stirring over the lowest heating setting, until the onions turn thick, pulpy, and jammy, 30 to 45 minutes. Taste and season with salt and pepper. Transfer to a clean, dry jar and store for up to 1 week in an airtight container in the refrigerator.
November 14, 2022
Cacio e Pepe
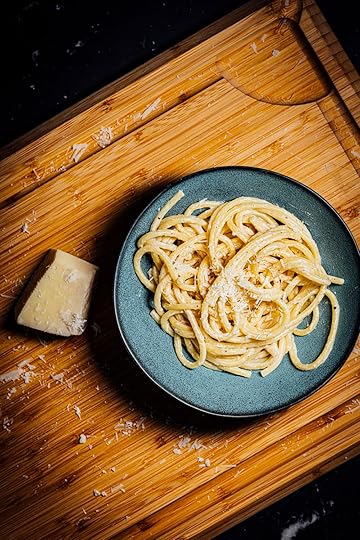
Cacio e Pepe
My all-time favorite pasta dish, the one I always make a point to order when I eat out, is cacio e pepe. Why do I love it so much? The cheese base that forms the sauce of the pasta is pure heaven. It has a rich, savory flavor from Pecorino Romano and freshly ground black pepper. My method here isn’t traditional but does solve a few problems with this dish. The cheese sauce is notorious for burning quickly, and it can also fall apart. The solution to these problems lies in the fact that the sauce is an emulsion of fat, proteins, and water. I find that blending the ingredients for the sauce with the hot pasta water makes a stable sauce that can be directly added to the cooked pasta. This dish should be prepared and eaten as soon as it is made.
The Cook’s Notes
While this is an effortless dish, making the cheese sauce can be tricky. It can quickly burn, stick to the bottom of a pan, and fall apart. Luckily the sauce for the pasta is an emulsion made up of proteins, fats, and water. I make the pasta sauce outside the pan in a blender. Using a blender provides high mechanical forces that help create a more stable emulsion, aka the cheese sauce. The sauce is then added to the cooked pasta and served, eliminating the need for cooking it on the stove.
Use fragrant varieties of black peppercorns like Tellicherry, Malabar, Vietnamese, or Sarawak here. It’s the only spice used in this recipe, and the quality matters.
Always use freshly ground black pepper, as ground black pepper loses its flavor within a few days.
Makes 4 servings
1 lb/455 g pasta like spaghetti, bucatini, or linguini
Fine sea salt
¼ cup/60 g unsalted butter
2 tsp ground black pepper like Tellicherry, Malabar, Vietnamese, or Sarawak plus extra for garnish
1 ½ cups/90 g finely grated Pecorino Romano plus extra for garnish
Cook the pasta according to the manufacturer’s instructions. Reserve the pasta cooking water.
Prepare the cheese sauce for the pasta. Melt the butter over medium heat in a small saucepan. Once the butter starts to sizzle, add the black pepper and swirl until fragrant, 30 to 45 seconds. Pour the warm butter mixture into a blender. Add the Pecorino Romano and 1 ¼ cups/300 ml hot pasta water. Blend until smooth and emulsified. The sauce should be creamy and thick; if you want it thinner, add 1 to 2 Tbsp of hot pasta water. Pour the sauce over the pasta and fold to coat well. Serve immediately and garnish with additional grated Pecorino Romano and other ground black pepper if desired.
November 13, 2022
Cornbread, Chorizo, Kale, and Cheddar Stuffing
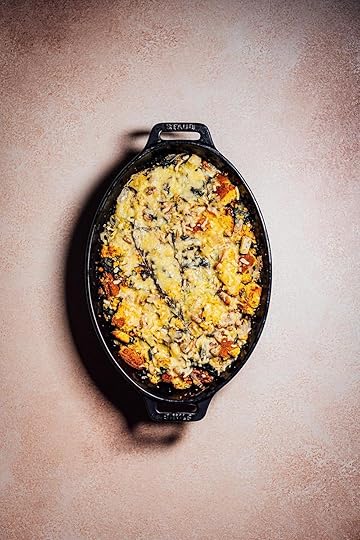
Cornbread, Chorizo, Kale, and Cheddar Stuffing
I can't help decide whether the right word is dressing or stuffing, but I can give you my favorite version. Sweet cornbread, softened kale leaves, and plenty of onions topped with cheddar make this a special stuffing. The chorizo provides heat and spice to the sweeter flavors of the stuffing. To prepare a stuffing that's crisp and moist, the cornbread is first dried and then soaked with the stuffing ingredients overnight. The stuffing is then partially baked covered and then uncovered, the result is a stuffing that is crispy on top and tender on the inside.
Tip: Prep the stuffing ahead a day and bake it an hour or two before dinner time.
The Cook’s Notes
There’s no need to dry the cornbread if it’s already dry (a little stale will help here); otherwise, dry them in the oven as instructed below in the recipe. Homemade or store-bought is fine and so is Jiffy's.
If you don’t want to use chorizo, skip it. If you’re vegetarian or vegan, use vegan chorizo, there are so many good brands available. The one thing to remember, regardless of whether the sausage is meat or plant-based, they’re all a bit salty, so watch out for oversalting the stuffing as you make it.
If you decide to skip the chorizo, use (1 tsp whole fennel seeds, lightly cracked + 1 tsp ground smoked sweet paprika + 1/4 tsp ground cayenne) and add them with the garlic.
Store-bought candied walnuts are a good time saver.
Makes 4 to 6 servings as a side
1 lb/455 g cornbread, cut into 1 inch/2.5cm cubes (See The Cook's Notes)
2 Tbsp extra-virgin olive oil plus extra to grease the baking dish
5 oz/140 g chorizo (meat or plant-based), crumbled
2 large/total weight 600g, yellow or white onions, diced
2 garlic cloves, thinly sliced
½ tsp ground black pepper
1 bunch/200 g dinosaur kale leaves, midrib removed and discarded, leaves shredded
1 large/200g baking apple, cored and diced
3 oz/85 g dried sweet and tart cherries or cranberries
¾ cup/100 g candied walnuts
2 cups/480ml low-sodium vegetable or chicken stock
Fine sea salt
2 Tbsp fresh thyme
2 sprigs of fresh rosemary
1 cup/80 g grated sharp cheddar
If the cornbread is fresh and not dry, then it will need to be dried. Preheat the oven to 200F/95C. Place the cornbread on a rimmed baking sheet and dry the cornbread in the oven for 30 minutes. Remove and let cool completely before use.
Heat the olive oil over medium-high heat in a large and deep skillet or saucepan. Add the chorizo and cook until lightly browned and most of the fat is rendered 6 to 8 minutes.
Add and sauté the onions until they turn translucent, 4 to 5 minutes. Add the garlic and pepper, and sauté until fragrant, 30 to 45 seconds. Add the kale and sauté until the leaves are wilted for 4 to 5 minutes. Remove from the heat and fold in the apple, cherries, and walnuts. Stir in the stock and season with salt. Fold in the thyme and cornbread, carefully taking care to avoid breaking the cornbread too much.
Grease a 9 inch by 12 inch/23 cm by 30.5cm baking dish with a little oil (it can be oval like in the photo or rectangular). Transfer the cornbread mixture to the dish. Top with the rosemary sprigs and press them gently into the mixture. Wrap the top of the pan tightly with one or two layers of foil by crimping the edges down and refrigerate overnight.
When ready to bake, preheat the oven to 400F/200C. Bake the dish covered in the preheated oven for 30 minutes, unwrap and bake for an additional 20 to 25 minutes until the top is golden-brown and crisp and most of the liquid evaporates. Remove the dish from the oven and sprinkle the top with the cheddar; bake for another 5 to 10 minutes, until the cheese begins to bubble and melts. Remove from the oven and let sit for at least 10 minutes before serving.


