
Tim McGiven's Blog
September 5, 2025
The 5 Best Things About WordCamp US 2025
Last week, I was excited to join 1,000+ other attendees in Portland, Oregon, for WordCamp US. This is the largest event in the US for the WordPress community to contribute to, showcase, share knowledge on, and learn everything WordPress.
I’ve been lucky enough to attend, volunteer at, and speak at several WordCamps. I usually jump at the chance to attend and spend time with the WordPress community. But if you haven’t been, you might be wondering what all the fuss is about. So I’ve put together 5 of my personal highlights from WordCamp US 2025.
Were you there? Please share your own experiences in the comments!
1. The diverse program offered learning and connectionWordCamp US spanned four days from August 26-29: contributor day, showcase day, and two presentation days.
On contributor day, nearly 300 community members across 19 teams spent the day contributing to the open source WordPress project. Anyone could walk up to these teams at their tables, sit down, and contribute.
Showcase day highlighted real-world examples of how WordPress is used, from the people behind them. There were plenty of talks, panels, and several in-depth workshops to get attendees energized about the possibilities of WordPress.
Then, it was time for the two presentation days. These featured keynote speakers, and three tracks of talks and panels from folks around the WordPress community. Topics ranged from using AI to code plugins and in neuroscience research, to design systems, data visualization, and accessibility.
On August 28, I spoke about Putting Creativity to Work. In my talk, I nerded out about P2 (the system of WordPress.com blogs we use to communicate internally here at Automattic), and I even gave away copies of my P2 comic in zine form.

This was my fourth time speaking at a WordCamp, and it reminded me of the incredible power of sharing your ideas at an event like this. Even though I had plenty of nerves (and imposter syndrome) for the days leading up to my talk, the many wonderful interactions I had afterwards reminded me that all the effort was worthwhile.
2. There was cool swag and great conversation in the sponsor hallI overheard one attendee say “There are so many great talks, but I’m here for the hallway track.” It’s true that a huge benefit of WordCamp US is that so many interesting people are gathered in the same physical space. Why not take advantage of that, by introducing yourself and having impromptu conversations?
The sponsor hall had many areas for these spontaneous connections. Cozy sitting areas, lawn games, a photo booth with props, skeeball and pinball games, displays of art from the WordPress photo directory, and even a live mural artist made for an energetic and inspiring space. Also featured in the space was a happiness bar, career corner, and creator studio, where attendees could troubleshoot WordPress issues, learn about available jobs in the ecosystem, and access a recording studio for creating content.
[image error]Photo credit: Pixel Nick PhotographyAnother highlight of every WordCamp is swag. Every sponsor booth had some kind of gift to give away, from stickers to food items, water bottles to tote bags. One standout was a poster, designed by Blue Ivory Creative, that was intricately illustrated with all kinds of WordPress and WordCamp imagery. There was even a claw machine filled with stuffed Wapuu toys. This was the only claw machine I’ve seen that actually wants you to win a prize!
Not to mention eating! With Portland being a famously foodie town, WordCamp organizers ensured attendees had access to its best-known treats. From a Voodoo Doughnuts truck in the sponsor hall to s’mores at the after party, I was never hungry.
I staffed the WordPress.com booth, which featured a prize wheel that made a very satisfying clicking noise when spun. This made for some great conversations about our powerful hosting for developers. I was proud to stand alongside other Automattic brands (WooCommerce, Jetpack, Gravatar, WordPress VIP, Pressable) to talk about the value we offer across the entire WordPress ecosystem.
 3. Portland is a vibrant and interesting location to explore
WordCamp US attendees were not only lucky enough to participate in all the fun of the event, but in our downtime I could also enjoy other delights of the city — like Powell’s Books, Forest Park, the Nike company store, and multiple vibrant neighbourhoods with hip bar and food scenes.
All these attractions were easy to get to on Portland’s public transit system. With a station right between the convention center and hotel, the MAX light rail made it super easy to get around. At registration, WordCamp US attendees were given a free pass for the duration of the conference, and I enjoyed taking it downtown, to the closing party, and to the airport.
4. The WordPress community is warm and welcoming, even for newbiesAlthough I am now familiar with many folks in the WordPress community, I still remember walking into my first WordCamp without knowing anyone. That’s always a daunting experience, no matter which space you’re entering. But at a WordCamp, you can expect lots of friendly faces, and people always willing to help you or engage in conversation. It’s a very inclusive space — all are welcome, from beginners to seasoned pros.
One personal highlight — I was invited to the Creator’s Studio to chat with Michelle Frechette and Darian Lusk, and ended up going live on TikTok with their guests Christian Taylor and Michael Cunningham. You just never know what’s going to happen!
5. The future of WordPress is brightOverall, WordCamp US showed me that there is no slowing down in the ecosystem of the world’s most popular content management system. This is a vibrant and productive community, with a diverse range of talented people helping each other, sharing knowledge, and moving the software further.
In WordPress co-founder Matt Mullenweg’s closing address, he highlighted the momentum and growth of WordPress, what’s shipping next (block-level commenting is so exciting!), and how AI will shape the project in the future.
I hope you can join us for one or more flagship WordCamps happening in 2026: WordCamp Asia in Mumbai, WordCamp US in Phoenix, or WordCamp EU in Krakow. Also, look out for local WordCamps near you.
See you there!


September 4, 2025
Learn at Your Own Pace With Our Free Courses
Whether you’re building your very first website, starting a blog, or looking to improve your site’s visibility, WordPress.com offers a growing library of free courses to help you every step of the way.
Our goal is simple: to give you the knowledge and confidence to bring your ideas online — with clear and practical guidance.
Explore Our CoursesWe currently offer three self-paced courses:
Create Your Website on WordPress.com (video course)
Perfect for anyone launching a new website, whether it’s for a small business, portfolio, or personal project. This course walks you through choosing a theme, setting up your homepage, editing your header and footer, adding essential content, and preparing to launch.
Self-guided Step-by-stepNo registration requiredBite-sized video lessonsGo at your own paceView CourseCreate Your Blog on WordPress.com (video course)
Ready to share your thoughts with the world? Whether you’re launching a niche blog, starting a personal journal, or building your online presence, this video course will guide you through every stage. You’ll learn how to:
Choose a theme that matches your styleWrite and format your first blog postOrganize your content using categories and tagsCustomize your blog’s layout and navigationEngage with readers and grow your audienceView CourseIntroduction to SEO (text-based course)
If you want more people to discover your site through search engines, this text-based course is for you. The learning objectives for this course are:
Understand how search engines find and rank your siteIdentify and use keywords that match what your audience is searching forStructure your content with headings, internal links, and media to make it easier to read and easier to findUse tools like Jetpack Stats and Google Search Console to monitor performance and make improvementsIn today’s crowded internet, good SEO helps you stand out from competitors and connect with your target audience. Higher search rankings lead to more visitors, increased engagement, and potentially more conversions for your business or cause.
View CourseLifelong learningWe know that learning how to use a website platform can feel overwhelming at first. These courses are designed to give you a clear path forward, one step at a time. You can learn at your own pace, explore the features that interest you, and skip the ones you know.
Each course is built for independent learning and hands-on discovery so you stay in control the whole way through.
Who Will Benefit Most?These courses are ideal for:
Beginners who are just getting started with WordPressSmall business owners building a web presenceCreators and bloggers looking to grow their audienceWhat’s Next?We’re always looking to expand our course selection to support users’ WordPress journey better. What course would you like to see next? Share your suggestions in the comments!
Start Learning TodayAll our courses are free and available now. Whether you’re building, blogging, or growing, we’re here to help you along the way.
View All CoursesSeptember 3, 2025
Is Your WordPress Site Slow? Here’s How to Fix It
Slow websites frustrate visitors, reduce your site’s visibility in search engines, harm conversion rates, and damage your brand.
Whether you built your website for fun and just want more people to enjoy your content, are using your site to promote your services and find clients, or are running a business website, slow load times are limiting its effectiveness.
Fortunately, you can fix a slow WordPress website.
In this guide, we cover the common causes of slow load times and how you can fix them. You’ll also learn how to test the speed of your site and record objective measurements of your site’s performance.
The costs of slow-loading websitesHere are some of the issues that slow site speed can cause:
Increased visitor abandonment rates: Studies show that over half of mobile users will abandon sites that take more than three seconds to load. Poor search engine rankings: Speed has long been a ranking signal used by Google to determine where to display sites in their search engine results. According to Google documentation, the main content of a page should load in under 2.5 seconds.Lower conversion rates: Google reports that each one-second delay in load time causes retail conversions to fall by 20%.Bad user experience: Even if the speed of your site isn’t slow enough to cause visitors to leave, it can still deliver a poor user experience, harming engagement, your brand perception, and the likelihood of a return visit.With the cost of slow load times being so high, testing the speed of your website and then taking action to improve its performance is highly recommended.
How to test your site speed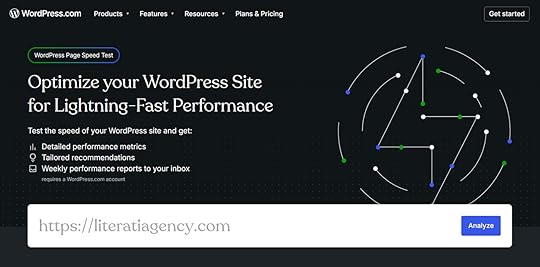
There are several ways to test your site speed, each offering slightly different insights into its performance and potential areas for improvement.
Here are our recommended tools for testing the speed of your site:
WordPress.com Speed Test : Our free tool is specifically designed for WordPress sites, providing clear and easy-to-understand insights into your site’s performance, with helpful suggestions for improvement. GTmetrix: Get free insights into site performance with multiple test locations and waterfall charts providing request-by-request visualization of the page load to help you identify problems in your content. PageSpeed Insights: Google’s free tool highlights issues with the metrics used by its search engine to evaluate site performance and determine rankings. SolarWinds Pingdom: Test the speed of your site for free from a range of locations, with a paid version that automatically tests load times at regular intervals and emails you the results.Review the results for both mobile and desktop tests to get a comprehensive picture of your site’s performance.
Which metrics actually matterWhen testing your site, you’ll see a range of metrics, including performance grades, letter ratings, and marks out of 100, as well as the page size and the time it takes to fully load.

These metrics can help you assess the impact of changes made to your site. However, they’re not the most useful when it comes to determining if your site is loading quickly enough.
For a better indication of how fast your site loads and its impact on user experience, conversion rates, and SEO rankings, the Core Web Vitals metrics are more important.
Core Web Vitals are a set of user experience metrics defined by Google. They focus on how fast, stable, and responsive a webpage feels to users, rather than just the time it takes them to fully load. This gives better insight into the impact of load times on the user experience.
There are currently three main Core Web Vitals that you should focus on:
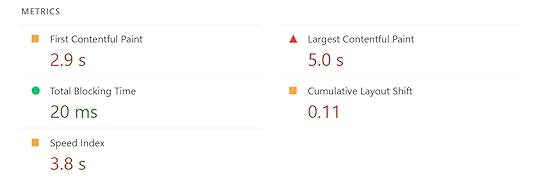
Largest Contentful Paint (LCP) : Measures the time it takes for the page’s main content to load. Aim for LCP to occur within the first 2.5 seconds of the page starting to load. Interaction to Next Paint (INP) : Measures the time it takes for the page to respond and visually update after a user interacts with it, such as clicking a button. Aim for an INP of less than 200 milliseconds. Cumulative Layout Shift (CLS) : Measures the extent to which visible content, including images and buttons, unexpectedly shifts during loading. Aim to have a CLS score of less than 0.1.The tools mentioned in the section above measure these metrics.
Once you start testing the performance of your website, you’re going to get a lot of data. It’s natural to feel overwhelmed by this, and focusing on the Core Web Vitals will be the most effective use of your time and effort.
Common causes of slow-loading WordPress websitesBelow are the most common causes of poor performance, along with steps to fix them. Working your way through this list will get you well on the way to being the proud owner of a fast WordPress site and enjoying all the benefits of improved load times.
Shared hosting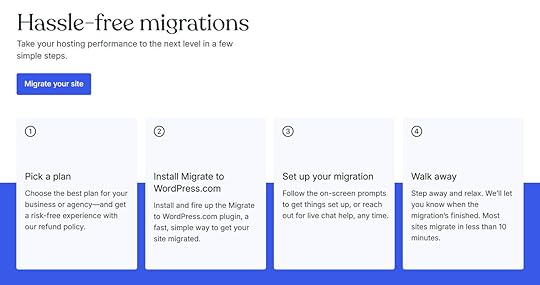
The quality of your web hosting has the biggest impact on how quickly your site loads. For example, sites using low-cost, generic shared hosting load more slowly than those using high-quality, managed WordPress hosting.
Upgrading your hosting can significantly impact the speed of your site. Depending on your starting point, upgrading your hosting is probably the biggest lever you can pull when it comes to improving site speed.
When upgrading, your main option is to switch to a higher-performance plan from your current host or move to another provider altogether. For a quick win, consider moving to WordPress.com managed hosting. Moving is easier than you think, thanks to its straightforward migration process.
For more information on choosing a host, check out our guide to the different types of web hosting.
Using a slow website builder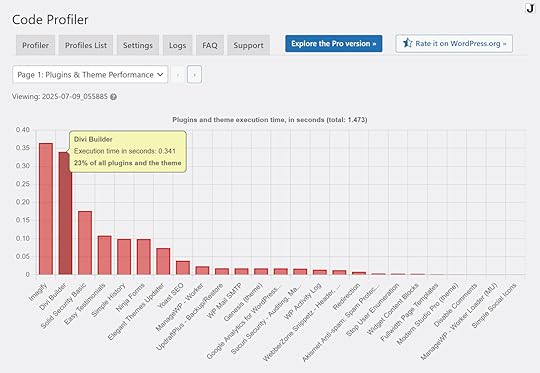
Adding a website builder to your WordPress site is an excellent way to take control of its design. However, not all website builder plugins are created equal, and some have the potential to slow down your site due to the way they’ve been built and the designs they produce.
One way to assess the impact of your website builder plugin on your site’s speed is to install a plugin like Code Profiler, which can help detect possible performance problems with themes and plugins. You should also test the load time of any pages you create with the builder to see how fast they’re loading compared to the other parts of your site.
Switching to a more performance-focused website builder, like WordPress.com’s website builder, can help solve the problem. However, any existing page designs will have to be recreated with the new builder if you want to improve their load times.
Unoptimized images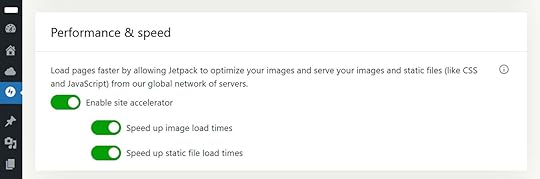
Images on your WordPress site can significantly slow it down. The larger their file size, the longer they’ll take to load and be displayed.
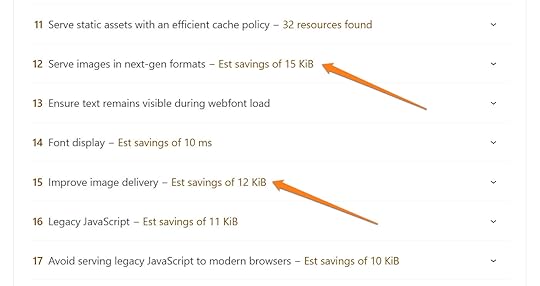
Running your site through a reliable speed test tool will highlight any images that could be causing problems. A good tool will also provide recommendations for improving image-related issues.
Ways to optimize your images so they don’t slow down your site include compressing them before uploading, using the appropriate file format, and enabling “lazy loading.”
Another option is to use the Jetpack Site Accelerator (CDN). This tool is available as a standalone plugin and is also included on the WordPress.com Business and Commerce plans. It can automatically resolve image-related load time issues.
Plugin bloatEach plugin you add to your site has the potential to slow it down. Therefore, it’s best to only add those you need, while also choosing plugins that are well-maintained and have positive user reviews.
A tool like Code Profiler can help identify the plugins on your site with the longest execution times. You can then swap these plugins for faster alternatives.
Another option is to replace multiple plugins with a single plugin that provides the same functionality. An example of this is Jetpack, which has a wealth of features covering backup, security, analytics, and SEO functionality, enabling it to replace multiple individual plugins.

You can also choose a web host that includes functionality currently covered by multiple plugins. For example, WordPress.com hosting includes backup, security, caching, social sharing, AI, monetization, and newsletter features that remove the need to install multiple single-feature plugins.
Lack of caching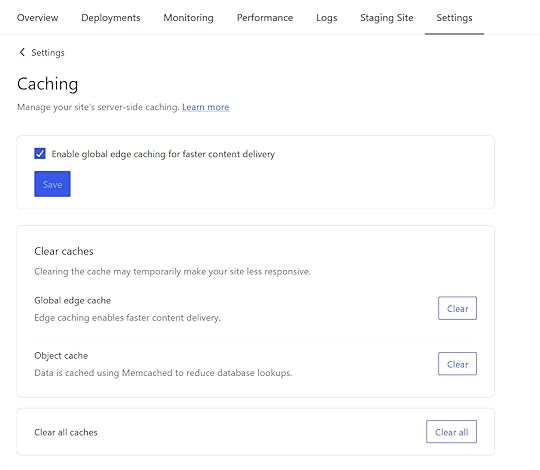
Caching speeds up load times for return visitors by storing copies of a site in a location that’s faster for them to access. There are several types of caching, including browser, page, and object caching, all of which can improve site speed.
Some web hosts, including WordPress.com, provide caching as part of their service. If your host doesn’t provide effective caching, many plugins for WordPress can add this functionality to your site, including Jetpack Boost, LiteSpeed Cache, and others.
Outdated WordPress or PHP versions
WordPress runs on PHP, a server-side scripting language, and like the WordPress software itself, new versions are released fairly often.
To keep your site running smoothly and as fast as possible, it should use the latest version of WordPress. Additionally, your hosting environment should be using the latest version of PHP, as newer releases often include performance improvements, enhanced optimization, and bug fixes.
Running older versions of WordPress and PHP can cause plugin compatibility issues, which can slow down your site or even cause it to malfunction. To help with this, enable automatic updates for your WordPress site. However, it’s essential to back up your site before updating WordPress in case something goes wrong.
Tip: Some web hosts, including WordPress.com, automatically back up your site before updates and keep the WordPress software and PHP updated for you, helping to prevent this issue.
Outdated theme or pluginsLike PHP and the WordPress software, themes and plugins are regularly updated, with older versions having the potential to slow down your site. This is due to new releases often containing code and performance improvements that can enhance load times and prevent issues that could be slowing things down, such as incompatibilities and security vulnerabilities.
Tip: Many plugins and themes can be set to automatically update every time a new version is released. Backing up your site before updating is recommended. Some hosts, including WordPress.com, automatically take care of that for you.
Too many ad or tracking scriptsAd and tracking scripts are typically added to a site to collect data on user behavior, including how visitors interact with the site, often for analytics and marketing purposes.
If you’re using third-party services like Google Analytics or Facebook Pixel, then ad and tracking scripts will be active on your site.
These third-party scripts increase the amount of data that’s loaded when a page is viewed. The overall size of the page increases, and the visitor’s browser must load data from a range of external sources. This slows down your site.
It’s usually not one script that’s having a large impact, but the combined effect of all of them.
To see which scripts are loading on your site and how long they’re taking to load, you can use WebPageTest and access the Waterfall and Request Details sections. The scripts will appear as entries with a domain that’s different from your site.

You can also use the Network tab in the Chrome browser DevTools to get similar insights.

Some ad, tracking, and other third-party scripts are inevitable if you want to have certain features on your site. However, be aware of how these scripts affect load time. You can then decide whether the impact is worth it.
Testing site speed before and after adding any features that require third-party scripts is also highly recommended.
Excessive pop-ups
Pop-ups are an effective way to grow your email list and promote offers, but they can slow down your site. This usually happens when they’re used excessively and are inefficiently coded and designed.
To prevent pop-ups from slowing down your site:
Use them sparingly.Ensure that you’re not loading more than one pop-up per page.Make them as lightweight as possible by optimizing any images you add to them.If your plugin allows, set them to only display after the page has fully loaded.Tip: For a lightweight pop-up tool, consider the Jetpack Newsletter feature.
Using HTTP instead of HTTPSIf your site isn’t using HTTPS, which you can easily check for yourself, it could be slowing your site’s load times. With HTTPS enabled, your site can use modern protocols to load faster through improved compression and the ability to load multiple files simultaneously over a single connection.
Using HTTPS also helps keep sensitive data secure. Therefore, it’s something you should add to your site by purchasing an SSL certificate or using one issued by your hosting provider.
Tip: WordPress.com hosting customers don’t need to worry about enabling HTTPS, as our plans include SSL certificates at no extra cost.
Improperly embedded third-party mediaAdding third-party media to your site, including YouTube videos and Instagram posts, can be a great way to enhance your content. However, if embedded improperly, they can slow down your site due to multiple network requests and the use of additional scripts to display the content.
Enabling “lazy loading” settings can prevent this media from being loaded until it’s in the visitor’s viewport. Replacing embedded videos with static thumbnails can also help stop content from loading until it’s needed.
You can ensure any third-party media is embedded properly by using the official WordPress Embed block or the blocks built for specific platforms, such as YouTube.
Excessive redirectsRedirects automatically send visitors from one URL to another. Redirects are often used when the address or URL of a page has changed, and when you’re merging and removing old content.
When used correctly, redirects can maintain your SEO and a user-friendly experience. However, too many redirects can slow down your site. This is especially true when multiple redirects are used consecutively, creating a redirect chain: As the visitor is redirected from one point to the next, the load time increases.
Online tools can help you fix the issue of excessive redirects by identifying them on your site. Once identified, you can remove any unnecessary redirects. You can also check site links and navigation elements, including menus, to verify they point to the current page URL and not an outdated one.
Heavy themesOne of the best reasons to build your site with WordPress is its vast library of high-quality themes. However, poorly coded themes or those bloated with excessive features, such as page builders, font libraries, and sliders, can unnecessarily slow down your site.
To avoid this, look for themes from reputable sources and check their reviews. Opt for themes marketed as being lightweight rather than all-in-one solutions. Avoid themes packed with features that your web host already provides or that you don’t need.
Tip: WordPress.com hosting plans include access to themes that are vetted for performance and quality, helping you to find a design for your site that won’t slow it down.
Database bloatWordPress uses a database to store your site’s content, including posts, pages, and images.
Over time, this database can become bloated with unnecessary data, such as post revisions, deleted content, spam comments, and data from plugins. As the database grows larger, it takes longer to find and retrieve the necessary data for pages to load.
There are several plugins you can install to keep your database optimized and running smoothly. However, managed hosting companies like WordPress.com take care of this for you, making it another task you won’t have to worry about.
Additional solutions and preventative measuresOther tips to correct a slow WordPress site include:
Minify HTML, CSS, and JavaScript. Reducing the size of your site’s HTML, CSS, and JavaScript files by removing unnecessary spaces and characters can improve its load times.Use a Content Delivery Network (CDN). A CDN distributes your site’s content across a global network of servers, helping it load more quickly, regardless of your visitors’ locations.Install an optimization plugin. Optimization plugins that can help speed up your site include WP Super Cache, WP-Optimize, and Jetpack.Hire a professional. Hiring a professional who’s skilled in optimization can help you identify and resolve the specific issues currently slowing down your WordPress site, as well as those that may arise in the future. As a cost-effective alternative, consider signing up with a managed hosting service that provides expert one-on-one support.Ready to move to WordPress.com?Moving to a faster web hosting provider is the one change that can have the most significant impact on the speed of your WordPress site. If you’re ready to get access to fast, secure hosting with a built-in website builder and many other useful features, try WordPress.com hosting. There’s even a hassle-free migration service to simplify the move.
Move your site to WordPress.comAugust 29, 2025
How Start a Web Design Business in 14 Practical Steps
There it is again: the tug on your heart, the yearning in your soul, the little lump that forms in your throat every time you daydream about quitting your job, starting a business, and finally living the way you want to.
It’s never been easier to strike out on your own, and one of the most accessible ways to do it is to start your own web design business.
Think about it: As more of our lives move online, the demand for high-quality websites is only increasing, as is the need for people who can build them.
Web design is a job you can do from anywhere, with minimal setup, and for clients in almost any industry. You don’t even need to know how to code (at least not to get started). Your journey starts here.
Why start a web design business?Your reasons for starting a web design business will carry you forward when times get tough. Here are some powerful reminders for those moments:
Work for yourself. When you’re the boss, you get to choose your projects and clients, and how to fill your time.Leave a dead-end job. No more cubicles, commutes, office politics, mandatory meetings, or deadlines you didn’t choose.Gain more freedom. Web design is a remote-friendly career. Whether you’re on a beach, in a mountain cabin, or exploring a new city, your work goes where you go.Set your own hours. Work when you’re most productive and take breaks when you need them.Learn new skills. Web design includes many aspects, from wireframes to user experience design to CSS. Learning new skills makes you more valuable and versatile.Do something meaningful. Contribute to projects you care about and create work you’re proud of.You can start lean. You don’t need inventory, an office, or expensive equipment to start a web design business.Scale your income. Your salary has a ceiling, but your business doesn’t. As your skills grow, so can your rates, your client base, and your income.What do you need for a web design business?Although overhead is minimal, there are some requirements for building websites for a living.
Relevant skillsRunning a web design business is mostly a matter of acquiring the right skills and knowledge. For starters, you need to:
Understand web hosting and Know the different types of websites, parts of websites, and layoutsLearn how to create a website and the stages of the web design processPick up basic business skills such as invoicing and doing taxesTo make sure the sites you build can compete on the web, you’ll also have to:
Study how to improve site speed with techniques like image optimizationBe able to implement security measures like user roles, SSL, and software updates to combat malware and DDoS attacksFamiliarize yourself with search engine optimization (SEO) to rank for relevant topicsFinally, while it’s absolutely possible to build websites for a living without coding, having at least a basic understanding of programming languages like HTML, CSS, JavaScript, or PHP allows you to make more significant changes and build more advanced features.
Thankfully, you don’t need to master all of these at the start; you just need to know more than your clients. You’ll learn many of these as you go.
Plus, you can outsource some of them with a managed hosting provider like WordPress.com. We take care of security, performance, software updates, and more, so you can concentrate fully on designing websites.
 Automattic for Agencies provides web design and development agencies with resources to help grow your agency.
Tip: Gain access to the WordPress.com agency partner program with discounted pricing, referral earnings, and extra tools. You can also easily move your sites to WordPress.com.
Reliable equipmentAnother thing you need is the right hardware and software. At the minimum, you should have:
Laptop or desktop computerReliable internet connectionHeadset or earbuds with microphoneCode editor (e.g., VS Code)Local development tool (like WordPress Studio)Some sort of backup solutionAdditional nice-to-haves include:
Second screenPrinter/scannerProject management softwareTime-tracking software (like Toggl)Accounting and invoicing softwareTools to create contracts/proposalsA customer relations management (CRM) solutionKeep in mind that buying business equipment can lower your tax burden or even give you back VAT.
14 steps to start your own web design businessOnce you have the necessary skills and equipment, follow these easy steps to create your web design company:
1. Pick your web design niche Narrowing down which types of businesses and clients you serve can help your agency stand out.
Defining exactly who you’d like to work with helps you create a better offer. For example, “I design websites for yoga instructors who want to sell online classes” immediately makes your services more relevant to that targeted group than a generic “I’m a web designer.”
When choosing your niche, consider the following:
Select an industry you’re experienced in. That way you already know your customers. It might be the industry you’re currently working in, a hobby, or some other niche you belong to.Pick something you’re passionate about. You’ll likely work in this area for a long time, so pick a sector that interests you.Consider targeting a particular location. While the internet makes it possible to work with anyone, geographically limiting your clientele can also have its benefits. For example, it may allow you to meet them in person, which is often beneficial in building close business relationships.Choose a niche with available budgets. Ensure that potential clients have the means to pay for your websites.2. Set your goalsSetting goals gives you a direction to work toward. To know where you want to move, ask yourself questions like:
What am I trying to achieve with my business?Which problems am I solving?Who do I want to be for my clients?How do I want to be different from the competition?Ideally, how much do I want to earn?What do I want my everyday life to look like?How many clients do I want to work with at any given time?What’s my long-term plan?Consider writing a mission statement that summarizes your answer to these questions, as a way to keep you on track when you feel directionless.
3. Decide on your products and servicesWeb design is a wide field, allowing you to provide a number of different services, such as:
Logo designBrandingUX designProgrammingWebsite contentVisualsSEOWeb accessibilityWebsite managementMaintenanceDecide what you want to do and can provide. While you can always branch out later, deciding on a baseline allows you to figure out your pricing.
 Unsure how to price your services? Research agency websites in your desired niche. This can help you develop a pricing baseline.
 Don’t think only about the immediate needs of your customers (such as a website), but also future requirements they’ll have, like content changes, design refreshes, or software updates. In addition, decide whether you want to offer pre-defined bundles, individual services, or both.
Finally, do market research to gauge demand for your planned services. Check competitor websites for their pricing, services, reviews, and positioning. Look at relevant job postings on job boards like Upwork or Toptal and analyze what clients are in the market for. You can also research relevant keywords in Google Trends or SEO tools like Ubersuggest, Semrush, and Ahrefs.
4. Figure out your pricing and ratesYour pricing model depends on your offerings. For example, you might charge a project fee for website design, but a monthly recurring retainer for site management and maintenance. To make things easier, base your prices on concrete deliverables, like the number of web pages.
When deciding your rates, factor in the following:
What your competition is charging: This can give you a way to differentiate yourself and also avoids severely undercharging for your services.Your cost of living, fixed costs, and business expenses: Divide required costs by the number of hours you plan on working (including time off and vacations) to get the rate you need to continue operating your business. You’ll need to add a percentage in order to make a profit.Your clientele and the value of your services: To a high-ticket business, a new website could mean a huge increase in revenue, so price accordingly.5. Settle on a name for your businessA fun part of striking on your own is . You’ll want to pick something that’s:
Easy to remember and pronounceAppropriate for your industry, location, services, and goalsShort and attention-grabbingNot already in use by someone elseBefore making a decision, check whether your desired domain and social handles are available. Also, consider your long-term goals — if you plan on building a team, naming your business “Kevin Jones Web Design” might not be the best choice.
6. Handle the legal stuffDepending on where you reside, there will be some bureaucratic hoops to jump through. Find out what licenses, permits, insurance, and other requirements you need in order to operate your business. If necessary, seek legal advice.
 There’s a lot of paperwork involved in starting a business. Fortunately, there are resources available to help.
An important step is choosing your business structure, which affects your taxes, liability, and legal requirements. The most common options are:
Sole proprietorship: This is simple and easy to set up, but offers no personal liability protection.LLC or equivalent: This involves more setup and paperwork, but protects your personal assets if your business fails.It’s not the most fun aspect of starting your own web design business, but don’t neglect it — you’ll thank yourself later.
7. Create your brandingBranding is your company’s identity. It usually consists of the following elements:
LogoColor paletteFontsVoice/personalityCompile these elements into a style guide for easy future reference. This is great practice to prepare you for how to approach client projects.
8. Register your domain and build your websiteYou can’t start a web design business without your own website. It’s part of your portfolio and directly shows what you can do for others, so build something clients would be happy to pay money for. Below is a great example of one designer’s cohesive and high-quality web presence that’s sure to impress potential clients.
 When your own website has a unique design, it shows clients that you can build unique sites for them, too.
Go through the same steps you would if working with someone else. Take copious notes to document your process. At the very least, your site should have:
A homepage with a call to actionService and pricing informationContact information and/or a contact formYour portfolio of past workAn about pageSocial proof, such as testimonials from happy clientsPublish it under your own domain, so you can set up a professional email address.
Tip: If you’re building websites for clients, you shouldn’t need too much advice from us. If you do need some guidance on building a site for yourself, follow this guide.
9. Start building a portfolioYour past work is one of the best ways to convince people to work with you. It’s living proof that you have the skills you claim to possess.
But how can you create one if you never had a client?
Do personal projects. Design a web presence for a fake company or redesign an existing site with your own ideas.Reach out to your network. See if anyone you know needs web work or can refer you to someone who does. Consider offering a special rate to fill your portfolio.Use freelance websites. Services like Upwork are not known for their great earning potential, but it can be worth doing a few projects to create a showcase.Be sure you do an absolutely stellar job for your portfolio pieces and make sure to collect testimonials for your website.
10. Establish processes and workflowsFormalizing your web design process makes it much easier to repeat it later on. It also makes you look professional and provides a streamlined client experience.
This typically consists of these steps:
Goal-settingScopingResourcingProject managementSitemap/wireframesContent creationStaging site setupVisual designTestingLaunchSite maintenanceTo put yourself in the best position, plan them out beforehand and document them as you go along. You can use our customizable checklist template, which includes more details on each step.
11. Create proposal and contract templatesFormalizing templates for work proposals and contracts helps you standardize your process, set expectations, and agree on terms, such as:
ScopeTimelinesDeliverablesDeposits and payment schedulePenalties for late paymentsCancellation policyCopyrightThis assures both you and your client agree on the important aspects of the project and avoids unpleasant surprises. Always be sure to protect your income stream by getting a deposit (usually 25–50%) before starting work, and hand over the finished site or files before being paid in full.
AI can help you create first drafts or you can use service providers like PandaDoc, Proposify, The Contract Shop, or Contract Killer. You may also wish to consult a lawyer.
 You have a lot of options when it comes to contract service providers.12. Promote your business
After putting the important pieces in place, you need to work on being seen. This starts with SEO to promote your website, which can include writing blog posts that address and solve issues common to your target group.
In addition, claim and fill out your Google Business Profile, Bing Places, and business directories like Yelp, Yellow Pages, and/or local alternatives. This ensures you’re visible to local clients.

Social media should also play a role in your promotion. Pick one or two platforms that make sense for you, create a simple content strategy, and start publishing. It may also make sense to create a YouTube channel and/or podcast to share your insights and promote your offerings.
13. Approach clientsRelying solely on inbound marketing isn’t always enough to find web design clients. You also need to play an active role with outreach.
If you’ve picked your niche well, it shouldn’t be hard to find relevant companies in your area who may need your services. Make a list of them and pitch your services to their marketing team. The more concrete and tailored your proposal, the higher your chances of being hired. You can also offer something with actionable value for free, like a consultation on how to improve their homepage.
Your personal network is also a good place to look for clients; job boards and Facebook groups are also worth trying.
 Cast a wide net across different channels and sources so clients can easily find you.
Find ways to network with potential clients in person. Attend business functions, chamber of commerce events, industry meetups, and similar gatherings. Focus on understanding business problems and providing your expertise as a solution to them. Stay in contact and follow up so you can build relationships before pitching your work.
Once you have clients, ask them for referrals — it’s often easier to land a new client through an existing one.
14. Keep learningWeb design is constantly evolving. Trends come and go, requirements change, and new technologies emerge often. If you want to stay competitive, you need to stay informed.
Developing new skills, learning additional tools, and acquiring more knowledge enables you to better serve your clients, which in turn allows you to offer more services and charge higher fees.
Start your web design business todayA web design business can be an amazing vehicle to build a fulfilling and flexible career. The barriers to start and the risks are low, though it takes effort and patience.
Need high-quality managed WordPress hosting for your clients? Consider WordPress.com. See what our hosting services have to offer.
August 26, 2025
Is WordPress Easy to Learn? Here’s the Real, Honest Answer
WordPress is a top-tier offering for anyone choosing a content management system (CMS) for their website. But one question often holds people back: “Is WordPress easy to learn?”
Yes. There’s a learning curve, but anyone can learn to use WordPress. With a bit of practice, you can build any kind of website you want.
However, WordPress is different (and slightly trickier to learn) than other site builders. That’s for good reason: WordPress offers far more customizability and long-term value, which is why it powers over 43% of websites on the internet.
Let’s take an honest look at how hard it really is to learn WordPress, the challenges you might face along the way, and how to overcome them.
How hard is it to learn WordPressYou’re far from alone if you find WordPress hard to learn, especially in the beginning. The WordPress.com forums are full of users — beginners and pros alike — asking questions and sharing advice.
Here are some common things new users find challenging:
WordPress is extremely flexibleUsing WordPress is like baking a cake from scratch rather than using a boxed mix. You get complete control over everything — your web host, domain registrar, layout, plugins, and more. That customizability is what makes it powerful, but it can also feel overwhelming. For beginners, the freedom can seem more like a lack of direction.
Tip: WordPress.com offers excellent courses and support documentation that will guide you through setting up your site.
WordPress has its own languageThe WordPress ecosystem contains features and terminology that are unique to the platform. For example, it’s easy to get confused about the difference between themes and templates since both affect the appearance of your site. Terms like “widgets,” “slugs,” “custom post types,” and “child themes” may also take some time to fully grasp. Until you’re familiar with the lingo, navigating WordPress can feel like learning a new dialect.
Tip: Our glossary will help you quickly understand basic WordPress terminology.
WordPress setup takes timeWordPress’ customizability means that setting up a website involves several moving parts, like , choosing a hosting provider, installing plugins, customizing your theme, and so on. The whole process can take time, even for seasoned WordPress users. But that time investment pays off in the long run because you’re building a website that’s tailored to your needs and goals.
Tip: If you decide to outsource building your website, our website design service offers excellent quality, competitive pricing, and quick turnaround times.
WordPress offers endless choicesThe plugin and theme libraries are packed with thousands of options for every feature you could ever need. However, that abundance (especially for plugins that perform the same function) can be overwhelming. Using a bloated theme or adding too many plugins can also slow down your website. It takes time (and trial and error) to find the right combination that works for your needs.
Tip: WordPress.com includes tons of features via Jetpack at no extra charge. All WordPress.com themes are built to perform well too.
Site maintenance is more complexWith WordPress, you’re responsible for your website’s upkeep. That includes managing security, performing regular updates, and creating backups. Skipping these basics or installing poorly vetted plugins can leave your site vulnerable to performance issues, conflicts, or attacks. It’s a bit of extra work, but it’s essential to maintain a stable and secure website.
Tip: Managed hosting providers like WordPress.com can handle all your site’s maintenance and updates, so you’re free to focus on doing what you love.
5 benefits of using WordPressWordPress can be intimidating at first. But the unmatched flexibility and long-term benefits it offers are something other site builders and CMS platforms simply can’t match.
Despite its learning curve, WordPress is well worth the effort because once you get the hang of it, you unlock a powerful, flexible platform that can grow with your needs for years to come.
Here are five benefits of using WordPress:
1. You own your website and contentThe biggest benefit of using WordPress is that it’s open source. This means you own your website entirely, including your content, data, and design. You’re not locked into a specific platform.
The same can’t be said for other website builders, where you can often migrate content, but not the whole site structure and design.
2. You have limitless customization optionsWith WordPress, you can customize everything about your website. Want to add a new feature using a plugin? Easy. Want to build a one-page site? Possible. Want to create a full-scale e-commerce website? You can do it.
Other site builders make it easy to get started, but it’s much harder to customize your site exactly as you wish.
3. Your CMS and hosting scale with youMost website builders think of what you need today. But what happens tomorrow? Or five years down the line?
WordPress’ customizability (which can be a little overwhelming at first) also makes it a long-term companion. Its open-source foundation gives you the flexibility to adapt your website as your needs evolve. And with reliable hosting (like WordPress.com), your site can handle surges in traffic while continuing to run smoothly.
4. You become more self-sufficientLearning WordPress makes you more independent and capable of running your site with confidence. You won’t have to rely on a developer or customer support every time you want to change a layout, add a feature, or update your content.
Over time, these skills can empower you not only to manage your own website but also to offer your services to others. Many freelancers, marketers, and small business owners have turned their WordPress knowledge into a side hustle or even a full-time career.
5. You have a massive community to rely onBoth WordPress.org and WordPress.com offer thorough support documentation, including step-by-step guides and video tutorials. There are also millions of users on forums, Reddit threads, and niche communities that can help with troubleshooting or customizing your site to your liking.
Now that you know why WordPress is worth learning, let’s talk about what the learning process looks like.
Tip: Need a head start? Tools like WordPress.com’s AI website builder make the process even easier, helping you generate a layout, customize it to your needs, and go live in minutes.
How long does it take to learn WordPress?The time it takes to learn WordPress depends on your goals, how much time you can dedicate, and whether you’ve worked with websites before. While you can get a basic site up and running in a day or two, mastering the platform’s more advanced features takes a bit longer.
Where do you learn about WordPress? A great place to start is with WordPress.org courses. They cover the fundamentals and can be completed in about 10 hours total:
The Beginner WordPress User course takes about four hours.The Intermediate WordPress User course takes about three hours.The Advanced WordPress User course takes about three hours.You don’t need to take all three courses to learn how to use WordPress — you can simply start using the platform and learn on the go.
The exciting thing about WordPress, and web development in general, is that the learning never really stops; there’s always something new to discover or improve.
How I learned WordPress (and why you should, too)I first started tinkering with WordPress at age 17. I wanted to build a blog to sharpen my writing skills and explore the world of content marketing. In the beginning, I hit all the typical roadblocks when setting up the site, choosing the right hosting provider, customizing the theme, and dealing with spam comments. But once I got the hang of it, things clicked, and managing my site became second nature.
I ended up running that website for years and used it as a portfolio for multiple internships. And here’s the kicker: Many of the companies I worked with didn’t just hire me for my marketing skills — they valued the fact that I knew my way around WordPress.
It wasn’t just that I could navigate the backend without breaking anything (though that helped). It was that I had taught myself how to solve problems by reading documentation, watching tutorials, and tapping into the WordPress community.
Later, when I left my full-time job to become a freelance writer, setting up my own site to establish credibility and showcase my portfolio was like riding a bike. The skills I picked up earlier made it easy to hit the ground running.
That’s why I strongly believe that WordPress is worth learning. It’s more than just a CMS or website builder — it’s a valuable skill set that makes you more independent, helps you stand out, and opens up real opportunities.
Whether you’re building your first blog or launching a business, the time you invest in learning WordPress will pay off for years to come. And, like me, once you get into it, you’ll be glad you stuck with it.
How to learn WordPressWe’ve already covered the WordPress course, which explains a lot about how WordPress works and how you can customize it for your needs. Here are a few more resources you can use:
WordPress.com’s excellent support documentation : Clear, detailed documentation to help you troubleshoot issues as they come up. WordPress.com courses : Step-by-step lessons on how to create your site or blog and optimize it for SEO. WordPress.com blog : Stay updated on new features, get practical tips, and find inspiration from real-world examples. WordPress.com YouTube channel : Follow easy-to-understand video guides to navigate and customize your site. WordPress Dev and Deploy newsletter : Perfect for aspiring developers, with actionable tips, product updates, and WordPress news.What if you need help from the support team or a fellow WordPress user? Here’s where to reach out:
WordPress.com’s support team : Get direct help from WordPress experts via chat or email. WordPress.com forums : Ask questions and get answers from the WordPress community. WordPress meetups : Connect with local WordPress users for in-person or virtual support and networking. WordCamp events are another way to connect with fellow WordPress users. They are large and exciting conferences held all around the world throughout the year. Learn more at central.wordcamp.org.Hosting with WordPress
Many of the frustrations people face with WordPress aren’t with the platform itself, but rather from poor-quality hosting. When your site is slow, buggy, or keeps crashing, it’s hard to enjoy the process of building anything.
The solution? Choose a hosting provider like WordPress.com, which combines the best features of WordPress (customization, flexibility, and long-term value) with the ease and convenience of reliable hosting, built-in security, and hands-off maintenance.
Build your site with WordPress.comMigrate your site to WordPress.comAugust 22, 2025
How to Use AI to Write Blog Posts (Without Losing Your Soul)
Your mind is buzzing with ideas, insights, stories, and opinions that your audience wants to hear. But turning these ideas into blog posts feels like pulling teeth.
That’s where AI comes in. AI can help you find the pulse of your audience, structure your ideas, and support your writing process, without compromising the originality of your voice.
In this guide, you’ll find:
A proven workflow for using AI to write blog postsReliable AI promptsTips to stay in control of your content7 smart ways to use AI for blog postsMuch goes into writing a good blog post: in-depth research, a structured outline, multiple rounds of drafting, and copy editing. If you’re struggling to manage all these steps, AI can do some of the heavy lifting for you.
Let’s look at the ways you can use AI tools to write blog posts that are worth your readers’ time.
Remember: You have to be intentional about using AI. These best practices and prompts will work best when you put time and thought into them.
1. Uncover unique topics and anglesTo create a standout blog post, you need to say what people haven’t already heard before. You can cover topics that nobody has answered properly or pain points that need easier solutions. To do that, turn to your audience.
Your best content ideas can come from listening to real people. Pay close attention to:
The questions people are askingThe problems frustrating themTheir aspirationsThe topics they’re discussingInstead of guessing what your audience wants to read, use AI tools to find and analyze relevant conversations on platforms like Reddit, LinkedIn, Threads, and more.
Here’s a prompt to find what your audience cares about:
Help me learn more about my audience by finding relevant real-life conversations about my topic.My topic is [your blog topic].Search through public online discussions, such as Reddit threads, Quora questions, YouTube comments, Amazon reviews, or niche forums, and do the following:- Summarize recurring themes, questions, or misconceptions that real users express about this topic.- Group those into useful categories: pain points, conflicting opinions, emotional triggers, and potential solutions.- Highlight any insights that appear frequently or carry emotional weight (such as frustration, confusion, or enthusiasm).Present your findings with clearly labeled sectionsOnce you’ve gathered enough context about your potential readers, zoom out and look for patterns. This is where you’ll find unique and interesting angles for your blog.
Think about themes or insights that other creators and brands have overlooked. For example, a skincare brand blog could:
Challenge common assumptions with the post Why Natural Skincare Isn’t Automatically Better for Your Skin.Present contrarian takes with the post Your 10-Step Routine Might Be Making Your Skin Worse.Offer practical advice with the post How to Simplify Your Skincare Routine Without Sacrificing Results.Tap into emotions with the post What No One Tells You About Feeling Insecure During a Skin Flare-Up.AI can help you go even deeper. Feed your audience research insights into it and ask it to identify themes, overlooked questions, and unconventional ways to reframe a common topic.
Try this prompt for finding blog topics that resonate with your readers:
Help me brainstorm topics for my blog based on insights about my target audience. My blog focuses on [your core theme].I want to find fresh, relevant, and original blog post ideas that haven’t been overdone.Here’s what I need help with:- Identify 5–7 subtopics or emerging conversations within this theme that are currently underexplored or gaining interest.- For each subtopic, list 1–2 unique angles I can take based on audience pain points, misconceptions, or recent trends.- Suggest one blog post idea that takes a contrarian, fresh, or deeply specific approach — something that’s unlikely to have already been written hundreds of times.- My target audience is [brief description of your audience].They’re typically struggling with [common challenges or questions].Format your response into a table so I can evaluate the angles and topics easily.Below is the response from ChatGPT’s o3 model, with the same skincare brand blog example.

You can pick topics from this list to design your editorial calendar for an entire month or quarter. If more topics are needed, simply ask the tool to list more angles for each subtopic.
2. Research existing viewpoints to find dataOnce you’re ready with a topic and angle, it’s tempting to immediately start outlining your blog post. But if you want to say something new, start by studying what’s already been said.
Read top-ranking articles, watch relevant media, and use a “dump document” to collect all the useful insights and ideas you find.
This could include:
Excerpts from other articles and essays Transcripts from podcasts or videos Links to social media discussions Anything relevant you find interestingThen, use AI to dig deeper into these findings and extract meaningful insights.
Here’s a prompt for familiarizing yourself with the existing perspectives:
I’m researching a topic to write a blog post on [topic]. Help me build an informed perspective on this topic based on the resources below.Here’s what I need from you:- Analyze the material I’ve shared and summarize the key takeaways, claims, and arguments across sources.- Highlight where sources agree, where they contradict, and what ideas are evolving or emerging.- Identify a few provocative questions or opinions I could explore further.- Help me absorb and reflect on the material so I can form a strong, original point of view.- Here’s the material:[Links or attachments]By the end of this exercise, you’ll have more clarity on how to pursue your topic.
In the next steps, you can lean on AI tools to find examples, data points, and other relevant research materials.
Here’s a prompt for digging deeper into your topic:
I’m working on a blog post about [your topic].The goal of this post is to help [target audience] understand or take action on [key takeaways].Help me find relevant supporting material, such as:- Recent statistics (from the past 2–3 years) with source links- Real-world examples or case studies related to this topic- Social media posts referencing this topicBelow is the result from using this prompt in Perplexity. You can select specific sources in this tool, such as web, academic, social, and finance.

Aside from collecting insights via secondary research, you can also interview subject matter experts (SMEs) to get firsthand knowledge.
AI tools can help you generate thoughtful interview questions to get useful context from your SMEs.
Use (and customize) this prompt to extract relevant questions for your blog posts:
I’m preparing to interview a subject matter expert for a blog post about [topic].The purpose of the post is to help [audience] understand or take action on [key takeaways]. The expert I’m interviewing is experienced in [brief description of their background, role, or area of expertise].Based on this, suggest a list of 10–12 thoughtful, original interview questions that:- Go beyond the basics and invite nuanced answers- Elicit examples or real-life stories from the expert- Tie back to the blog post angle and audience needs- Uncover fresh insights that haven’t been widely sharedOrganize the questions into categories, such as: - Background/context- Strategy/methods- Reflection/perspective3. Structure your research into an outlineAt this point, you’re likely looking at pages of scattered notes, screenshots, interview transcripts, and half-baked thoughts. It’s a mine of information, but you have to dig deeper to strike gold.
This is another great place to bring AI into the loop and structure your ideas into a solid outline.
The quality of your AI-generated outline depends entirely on the clarity of your input. By giving AI tools important context about your blog post, you can generate a high-quality outline.
Share context within your prompt by adding details about:
Target audience: Describe your readers by discussing their struggles and concerns. Also, talk about the transformation they’re looking for.Existing viewpoints: Summarize what other creators/brands have already covered about this topic.Informational gaps: Highlight where others miss the mark and the gaps you want to fill with your article.Your unique angles: Discuss your content angle and share in-depth context around what your article is about.Research material: Add all the relevant resources you want the tool to refer to in understanding the topic.Once you’ve collected all these insights, try this prompt for building an outline:
I’m working on a blog post, and I’ve gathered a lot of raw research material. I want you to help me turn this into a clear, structured blog post outline.Here’s all the context you need to generate a high-quality outline:[Target audience][Existing viewpoints][Informational gaps][My unique angle][Research material links]Based on all of the above, prepare an outline that includes:- A clear introduction- Logical flow of sections- Opportunities to emphasize originality or depthKeep the structure practical, engaging, and tailored to this specific audience.Most AI tools allow you to create a dedicated space or project for organizing topical information.

Added all your research material to the space. Upload documents and add links in addition to writing specific instructions for your project.

Using this space saves you the hassle of sharing the entire context repeatedly, for each prompt.
4. Write in your voice and styleMost writers make the mistake of starting their AI prompts with something like “write a blog post about…”
Instead, you want to first share a few samples of your writing so the AI tool can understand your tone and style.
It’s even better if you can create a set of guidelines that describe your writing style. These can include notes on words you tend to avoid, how long your sentences are, and any particular details unique to you.
Here’s an example prompt to use:
Help me write a blog post in my voice.I tend to write in a conversational, clear, and slightly contrarian tone.I use short sentences and punchy phrasing to keep the momentum.I avoid filler phrases, fluff, and generic intros (such as “In today’s world…”).I prefer concrete phrasing over abstract jargon.I also speak directly to the reader and occasionally ask rhetorical questions.I like to close sections with sharp takeaways or unexpected turns.Below is my blog post outline and some notes. Help me expand this outline into a rough first draft written in my style described here. [Outline and notes]The bottom line: Don’t simply hand a topic and ask AI to write your entire post from scratch. That’s how you end up with something passable, but forgettable.
To produce great content, lean on your critical thinking and writing skills with some help from AI to keep the momentum going when you feel stuck. Share your research material, outline, and voice notes to let AI support your writing process. You can use these tools to jumpstart a section, rework a messy paragraph, or rephrase a sentence that feels clunky.
5. Draft, refine, and localize your posts within WordPress.comThe Jetpack AI Assistant, available as a block within the WordPress.com editor or on any Jetpack-powered WordPress website, can help you refine your blog posts with a few prompts.
You can ask the AI to write an entire post from scratch, smooth clunky phrasing, fix spelling mistakes, or adjust the tone. The tool can also translate your content into several languages to reach a global audience.
Because this AI assistant works inside the block editor, it makes in-context edits without the need to shuttle between tabs.
 6. Refine your blog posts
 Once your blog post is ready, AI can help add the final touches.
For starters, ask your AI tool to summarize your draft in 3–4 lines. Then read this summary to check whether it captures your main angle, and if it sounds generic or similar to existing content.
If the summary misses the mark, your post probably does, too. To correct that, ask more questions about exactly what to revise in your draft.
Here’s another prompt to get concrete suggestions for editing drafts:
I’ve written a draft blog post on [topic] and I want your help to improve it. Don’t rewrite anything. I want your suggestions to sharpen the ideas, tighten the structure, and make it easier to read.Here are some aspects to focus on:- Are there typing errors or grammatical mistakes in this draft?- Does any sentence, paragraph, or section feel vague/confusing?- Are there any repetitive sentences or sections that I should cut?- Does the draft flow logically from one idea to the next?- Any suggestions to improve transitions between sections?- Where can I add an example, insight, or stronger phrasing to make the message more compelling?Please show your suggestions inline (or note the edits section by section), and don’t remove my original content. Here’s the draft: [Pasted full blog post or uploaded document]When you’re done with editing, you can use AI for packaging your draft. That means generating some options for meta titles, headlines, and meta descriptions.
Use a prompt like this to get specific output:
Write three alternate headlines for this article: one curiosity-driven, one benefit-focused, and one for a more advanced audience.7. Visualize complex informationVisuals can simplify your message and help readers quickly understand the insight. With AI tools, you can easily brainstorm ways to visualize complex ideas in your blog post.
Here’s a simple prompt to conceptualize an infographic for any idea:
I want to create an infographic that visually explains this idea:[idea summary or write-up discussing this idea]Suggest a simple infographic concept that would help readers understand this easily. Include:- The type of visual (comparison chart, timeline, flowchart, etc.)- A rough breakdown of what each part should include- What the visual will look likeMake it easy for a designer to understand.You can then use that concept to have AI tools design visuals for you. In the example below, ChatGPT interprets the response to the above prompt to create an image.

You can also add text guidance on the content and style of the visual, such as the following example produced by Napkin’s AI tool.
 Become a better blogger with AI
 If you’ve stared at blank drafts for far too long, it may be time to leverage AI to help you write and refine high-quality blog posts. Create a simple document to save all these prompts (and others), so you can easily use them whenever needed.
Ready to share your thoughts with the world? Start your blog with WordPress.com and bring your ideas to life.
August 20, 2025
Staging Sites, Now More Powerful Than Ever
Staging sites let you safely experiment, like testing new themes, trying plugins, updating content, or fine-tuning your design, all without making unwanted changes to your live site.
But staging site management can sometimes be challenging. A cumbersome interface and limited sync options can slow development, increase the risk of errors, and make it harder to rely on your staging environment, especially when you’re working across local, staging, and production.
That’s why we’ve redesigned the WordPress.com staging site experience to streamline the process, giving you the flexibility to move between environments with confidence and decide exactly what gets synced between staging and production.
 As a reminder, staging sites are included on all
Business and Commerce WordPress.com plans
.
As a reminder, staging sites are included on all
Business and Commerce WordPress.com plans
. As a reminder, staging sites are included on all Business and Commerce WordPress.com plans .
Why now?We’re committed to ensuring WordPress.com is the best place to build and host WordPress websites. That means continually reviewing the product, conducting walkthroughs, and listening closely to your feedback.
A recent audit of the Hosting Dashboard surfaced three key friction points: unclear sync behavior, unintuitive environment switching, and hard-to-find destructive actions like “delete.”
We also added selective sync to WordPress Studio, our free local development tool, last month. This feature — one of the most requested enhancements — lets you choose exactly what content is synced from your local sites to staging or production on WordPress.com.
To create a seamless workflow from local to staging to production, we brought the same level of control to staging sites on WordPress.com. The result is a redesigned interface that aligns with our modernized navigation and introduces the same selective sync experience you already have in WordPress Studio.
 More power and control for your staging sites
The updated staging site interface gives you greater flexibility, clearer actions, and better visibility into what is happening and when.
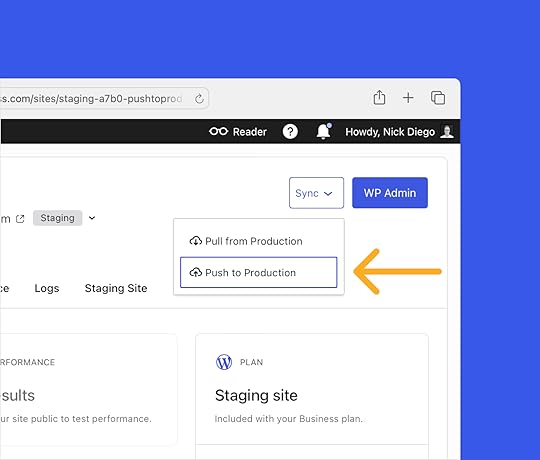
Here’s what’s new:
Top navigation environment switcher: Quickly move between staging and production from anywhere in your dashboard.Selective sync: Push or pull only the folders you choose between staging and production, avoiding all-or-nothing syncs.Cleaner layout and updated visuals: A streamlined interface with clear separation of actions and status indicators, consistent with the rest of the Hosting Dashboard.More intentional staging site deletion: The delete button now lives in your site settings, keeping destructive actions separate from daily workflows.These updates make plugin and theme development, as well as quality assurance workflows, more efficient. They also reduce the risk of unwanted syncs and give you precise control over your staging and production environments.
Get started todayWith the latest enhancements to staging sites, you’ll enjoy more flexibility, less clutter, and an overall better hosting experience — all for the same flat rate, starting at just $25/month.
If you’re on a Business or Commerce hosting plan, you can start using selective staging site sync and the updated interface today. Just head to your Hosting Dashboard, where you’ll also find full documentation and support if you need help getting started.
After trying the new staging site features, we’d love to hear your thoughts. Share your feedback and suggestions in the comments below.
August 19, 2025
Know Your Audience: Meet the New Subscribers Feature in Jetpack Mobile
Picture this: You’re on the road when you get a notification that someone new just subscribed to your newsletter. You want to know more about this reader: are they engaging with your content? What other posts resonated with them? Until now, getting those insights meant waiting until you were back at your computer.
That all changes with the Subscribers feature in the Jetpack mobile apps.

 Ever wonder who’s actually reading your content?
Content creators face a common challenge: understanding their audience while managing busy, mobile lifestyles. You might publish consistently and see your subscriber count growing, but key questions remain unanswered:
Who exactly is reading your content?Which subscribers are most engaged with your newsletters?How can you add new subscribers when you meet potential readers in person?What’s the best way to track your community growth over time?The Subscribers feature puts these insights directly in your pocket, transforming your mobile app into a comprehensive audience management tool.
Your complete subscriber dashboardThe Subscribers feature gives you a detailed view of everyone who follows your content, whether they’re email newsletter subscribers or visiting from the WordPress.com Reader. Here’s what you can see at a glance:
Subscriber profiles: Profile pictures, names, and email addresses help you put faces to your audience. You’ll also see when they subscribed and the country they’re reading from, giving you a better picture of your community.
Engagement insights: For each subscriber, you’ll see valuable metrics including emails sent, open rates, and click-through data. This helps you identify your most engaged readers and understand which content truly resonates with your audience.
Smart search and filtering: Need to find a specific subscriber quickly? Search by name or email address, then filter by subscription type—email subscribers who get your newsletter directly, or Reader subscribers who follow you through WordPress.com. Sort by join date or alphabetically.
 Streamlined subscriber management
Adding new subscribers is now simple and secure, whether you’re adding one person or multiple subscribers at once. Built-in email validation prevents typos, while clear consent notices ensure you’re following email marketing best practices. Plus, you can directly contact engaged subscribers right from the app.
For creators with paid newsletters, the feature includes subscription plan details, billing cycles, renewal dates, and revenue tracking per subscriber—giving you complete visibility into your newsletter business.
 Insights in your hand
Content creation isn’t just about writing great posts — it’s about building meaningful relationships with your readers. The Subscribers feature transforms your mobile device into a powerful audience management tool, giving you the insights you need to create content that truly connects with your community.
Whether you’re a blogger building your first following or a newsletter publisher managing lots of subscribers, this feature helps you understand your audience better and foster stronger connections with the people who matter most: your readers.The Subscribers feature is currently available in the Jetpack mobile app. If you already have the app, go check it out. If you don’t, download it today for iOS or Android.
August 14, 2025
How Long Does It Actually Take to Build a Website? Here’s What Our Experts Say.
You’re sifting through a lot of conflicting advice on how long it takes to build a website. Some say it takes a few days, others say weeks. So, who’s right?
The truth is, most website development timelines are just guesstimates.
These generic timeframes don’t factor in variables that could make or break your development process.
That’s why we spoke to our partners at WordPress.com to get realistic timelines for building a website. Drawing on their years of experience, our website development experts also share key factors to consider when estimating these timelines.
TL;DR: Here’s how long it takes to build common types of websitesSmall site (five pages or less): ≤ 1 weekDropshipping ecommerce site (<1000 products): 2-4 weeksLarge education website (school/university): 3-4 weeksGovernment website: 4-6 weeksLarge media website: 6-8 weeksEnterprise website: Several months to over a yearThe site you’re reading right now would likely take 6-10 weeks to build.
Note: These estimates cover how long it takes to launch a site, and don’t include considerations for future content creation or maintenance.
Key factors that affect your website design timelineThere’s no universal timeline for building a website. Some sites go live in weeks, others stretch across months.
But you don’t have to rely on guesswork for your website design timeline. Here are the three factors that will determine whether your project stays on track or spirals into delays.
Planning and strategyThe planning phase sets everything in motion.
Start by identifying:
Core purpose: Do you want to show your work, generate leads, sell products, or something else?Target audience: Who exactly do you want to reach? And what can they expect to get from your site? Essential functionality: What are the must-have features of your site, like lead capture forms, payment gateways, dynamic content, and more?A week spent planning all these details upfront can save you months of revisions (and frustration) later. The goal is to keep everyone aligned on what success looks like and prevent scope creep or backtracking later.
Defining the scopeScope defines the size and complexity of your site.
Scope creep can start with something as small as adding a new page, and suddenly, you’re two months behind schedule.
That’s why you want to finalize specifics like:
Number of pages Type of features/integrationsLevel of design and animationThe more pages, integrations, or custom features you add, the more development time it takes.
As a best practice, you can divide your site’s scope into different phases. Phase 1 can include all essential features you need for the main launch, and the next phases can cover additional details.
Stakeholder alignmentNothing kills momentum like conflicting feedback from different stakeholders. It can stall your progress for weeks.
The solution: Align your key decision-makers before you start building.
Make sure all stakeholders agree on:
Overall vision and goalsTarget audience and messagingBudget and timeline expectationsWho has final approval on which aspects of the siteExperts at rtCamp, an enterprise WordPress solutions provider, emphasized the importance of these factors for realistically determining website development timelines.
Once there is clarity on scope and decisions, a competent agency can go faster than even the times mentioned above. If clarity and alignment are still being worked out after kicking off the project, it can significantly stretch the project. However, sometimes that is required too. In many cases, clarity & alignment only happen once you get started.
– rtCamp
Put simply, this alignment ensures that everyone is working toward the same vision.
Note: Not familiar with business terminology like “stakeholder”? It’s just a term referring to anyone whose input is required to get a website launched. If you’re building a website for yourself, you’ve got nothing to worry about.
How long does it take to build a website using different methodsOnce this legwork is complete, it’s time to start building.
We’ll break down two common methods for creating a website to help you determine your development timelines.
Here’s what our experts say about the timeframe for creating websites of different sizes:
Site size/scopeDIY site builderWordPress.com AI website builderProfessional agency / in-house teamSmallFew hours-2 weeks<2 days2-4 daysMedium1-4 weeks3-7 days2-4 weeksLarge — — 6-10 weeksExtra-large——6 months-1 year +Looking to build a simple website with five pages or fewer? Use our website design service to get a professionally designed website in four days.
And if you want to create a more complex custom website, we can match you with a web design agency suited to your business, budget, timeline, and expectations.
 1. Do-it-yourself approach Best for: Small business, side project owners, hobbyistsType of websites: Personal portfolios, simple brochure sites, small blogs
WordPress.com lets you build a professional website entirely on your own, even if you don’t have any coding or design skills.
With this approach, you’re investing your hours learning a platform and creating a site one block at a time. It’s a trade-off between time and money, but it’s ideal for those with tight budgets and a desire to learn.
Tip: WordPress.com lets you create sites of all kinds. Check out the different types of websites you can build with this platform.
Here’s how you might get started with WordPress.com. After you create an account, you’ll need a theme that matches your vision for your website.
Choose from thousands of options available in WordPress.com’s library. Browse by specific use cases and industries, like real estate, health and wellness, music, and more. Plus, every WordPress.com theme is mobile-friendly by default, so you don’t have to spend more time making your site responsive.

After landing on the perfect theme, you can customize it to match your style.
At this stage, it’s tempting to tweak every color, button, and font till you find the best combination. But what really moves the needle is creating a proper structure and layout for your site. Think of this step as setting the foundation before the real work begins.
Instead of jumping straight into design edits, you should define:
Which pages your site will includeLayout for every pageNavigation structureTip: Want to learn how to build a website with WordPress, step by step? Our free video course will show you how.
How long should you expect this work to take? We chatted with Mike Ilsley, Solutions Architect for our website design service, to see how long this DIY approach takes. He shared:
For first-time WordPress users, building a five-page site can take anywhere from a few hours to several days or even weeks, depending on how comfortable they are with the tools. That includes time spent learning the platform, choosing a theme, customizing content and design, and troubleshooting along the way.
– Mike Ilsley, Solutions Architect @ WordPress.com
WordPress.com’s AI Website Builder can slash this timeline from weeks to days (or even hours).
Simply add a prompt describing the type of website you want to build. Something like: “I’m launching a freelance photography business.” Then, answer a few questions about your business and goals.
In a few minutes, you’ll get a full-fledged website designed to meet your preferences. Edit this first draft to add your creative touches and roll it out when you’re happy with the result.
 2. Working with professionals Best for: In-house teams, mid-to-large businessesType of websites: Enterprise sites, government or education sites, media or news platforms, large ecommerce sites
If you want to build a custom website that truly stands out but don’t have months to master design tools, working with professionals can be a smarter move.
Think of it this way: you could learn to rewire your house, but you’d probably rather call an electrician to save yourself all the hassle.
When hiring a professional, you have two main options:
Freelancers: They’re perfect when you need quality work without a hefty price tag. You can hire specialists for design, development, and copywriting. Agencies: They bring an entire team to cover all bases for your website design project. Work with an agency for complex sites with tight deadlines. You can choose a small or a big agency based on your budget.Unlike the DIY approach, working with professionals involves a few different steps before you can get to the final product. Plan for these phases if you take this route.
Vetting and hiringYou can expect to spend anywhere from a few days to weeks finding the right vendor to build your website. This search involves browsing portfolios, interviewing shortlisted candidates, and comparing prices.
Onboarding and briefingOnce you’ve selected a designer or agency, you want to take a week or two to clearly outline your expectations.
Create a detailed creative brief covering your goals, target audience, must-have features, and brand guidelines. Curate helpful references to share your creative vision with the designer.
The bottom line: You want to provide clarity and show what success looks like for you. The more clarity you can offer at this stage, the fewer revisions you’ll need later.
Setting timelinesFrom there, you can establish communication channels and align on milestone-based timelines. For example, week 1-2 can be about wireframing, and week 3-4 can be about creating the first draft for the homepage.
Map out clear milestones for both sides to stay accountable and prevent any delays in the web design process.
Tip: Stay involved in the process without becoming overbearing. You can plan weekly check-ins or status reports to keep tabs on your site’s progress.
Design and developmentNow, it’s time for you to take a step back and let the professionals work their magic. The timelines for this phase depend on the scope and complexity of your site.
In the design phase, you’ll see static/interactive mockups of every page.
These wireframes give you a sense of the site’s look and feel. Typically with large website design projects, you can request iterations based on your creative preferences and align on the designs before starting the development cycle.
In other words, think of it like working on your dream house.
You review detailed blueprints, request changes, and only start construction once you love the plans. Much easier to make changes on paper than after the foundation is poured.
 Source
 Once the designs are final, the development phase turns these layouts into live, functional pages.
In our chat with Mike Ilsley, he highlighted that build time depends on the site’s complexity, integrations, and the amount of content involved. Talking specifically about enterprise sites, he explained how it can take several months to complete projects of such scale:
Testing and reviewEnterprise websites can take anywhere from several months to over a year to fully build and launch. Even for experienced teams, projects at that scale typically involve multiple stakeholders, custom development, ongoing QA, and a phased rollout. It’s not uncommon for large organizations to work with dedicated teams over many months to get everything in place.
– Mike Ilsley, Solutions Architect @ WordPress.com
Finally, your site goes through several rounds of testing and review before you give the final approval.
Professionals often send a checklist or staging site for you to review. You should thoroughly check every detail on every page. Test on different devices and browsers to find any bugs or areas of friction in the user experience.
Remember that it’s much easier to fix issues before launch than after.
Ready, set, launch on scheduleBuilding a website can be messy. And you’re bound to lose time without proper planning.
Use this guide to map out everything you need to go from idea to launch and plan your timelines realistically. Remember to build in buffer time at every stage.
Want to fast-track this process?
WordPress.com’s AI website builder does the heavy lifting for you. In minutes, you’ll have a complete, professional site that would normally take weeks to create from scratch. Customize it to match your vision, and you’re ready to launch!
Try WordPress.com’s AI website builder and see how quickly you can roll out your website.
August 12, 2025
How to Choose a Web Host: 10 Factors You Should Consider
Take it from someone who’s been burned by hosting companies: you don’t want to skimp on thoroughly evaluating your hosting provider. Overwhelmed by hundreds of web hosting providers online, I shrugged, “This one looks the cheapest,” and purchased a yearly plan without a second thought.
Poor customer support, inaccessibility, and a migration later, I regretted not spending more time choosing a better web host.
Don’t make the same mistake I did. Put in the time to make the right web host choice in the beginning so you don’t have to deal with a headache later.
What should you even evaluate in a web host? There are several features on their pricing pages, and many of them look similar. Which criteria are important? What can you compromise on? We’ll cover all that (and more) in this article.
What should you know before evaluating web hosts?You can’t examine the various web hosting providers accurately if you aren’t 100% clear on what you need. Here’s a quick checklist of questions to help you nail down your requirements:
What kind of website are you building? Get clear on your website’s category — is it a portfolio or a blog? Or are you planning to run an online store? The kind of website you build determines which features are the most valuable to you in a web host.How much traffic do you expect your website to receive? Your expected traffic and plans to run ads will help you choose web hosts that can scale as you grow.
What security features do you need? If you are running a site that will store a customer’s payment details or any other sensitive information, you need a web host with strong security features.
What is your budget (now and in the future)? Your web host provider should be able to grow with you as your website’s needs evolve, without breaking the bank. Have a rough estimate of what you can spend on a web host now and in the future.
What is your technical skill level? If you can (and want to) configure everything yourself, your web host needs will look different than someone who isn’t tech savvy and/or doesn’t prefer to handle the hosting technicalities themselves.
Once you’ve answered the above questions, you’ll be much more confident in evaluating the various web hosts in the market. You should answer the above questions even if you’re migrating your site from one host to another — it will help you pinpoint what additional services you’re looking for.
Now that you know exactly what you need, let’s get into the nitty-gritty and examine each individual factor you should vet in a web host.
10 factors to consider when choosing a web hostHere’s a comprehensive list of factors you should consider for each web host you examine:
1. Type of hostingThere are several types of web hosting — each suited to unique website sizes, traffic levels, technical skills, and budgets. Pick the right one for your needs.
Shared hosting is when you share your server with other websites. This makes it more affordable, but slower.VPS hosting is when you share your server resources with other websites, but have a dedicated slice of your own. It’s more reliable and scalable than shared hosting, but it also costs more and requires technical know-how.
Dedicated hosting is when you have a server all to yourself. Your website is fast and reliable. Plus, you have complete control over every aspect of your website, but it can be expensive, and you have to manage everything (or pay someone else to manage everything).
Cloud hosting is when your site runs across multiple cloud servers. It’s reliable and fast, but may require setup and monitoring.

Some web hosts in the market provide all these hosting types, while others provide specialized hosting. Choose web hosts that offer the kind of hosting you need now and might need in the future.
For example, if you’re building a food blog from scratch, you might be A-OK with shared hosting in the beginning. However, as your website traffic grows, you might need to move to VPS or dedicated hosting to improve your site experience. In this scenario, look for web hosts that offer both shared and VPS hosting.
While you’re at it, it’s also worth evaluating the types of hosting at the service level.
Unmanaged hosts provide a barebones server that you manage yourself. This means that you have to handle any updates, firewalls, backups, etc. It’s more cost-effective, but only recommended when you want a customized server setup and have in-house technical resources to manage it.Managed hoss handle the majority of the technical tasks, such as server setup, security, backups, and more. It often costs more than unmanaged hosting, but the peace of mind (and time saved) is worth it.

Your web host always manages shared hosting. This means the host is responsible for configuring the distribution of resources and ensuring each site is secure. If you’re opting for shared hosting, it’s especially important to evaluate the quality of your management host because you don’t have control over your website’s security and resource allocation.
You can choose between managed or unmanaged hosting in all other hosting types. However, as discussed before, unmanaged hosting is the right choice only when you need to customize the server stack and know how to do it well. For everyone else, managed hosting is the better alternative because it allows you to focus on growing your site rather than doing upkeep tasks.
Tip: If you choose WordPress.com (which offers managed WordPress hosting), your site will stay fast, secure, and online without any hassle. Your whole website management — including backups, updates, and infrastructure — is on us.
2. PricingPrice is an important factor when it comes to choosing web hosts. You don’t want to make the mistake of thinking that the cheapest or the most expensive is the best option.
Instead of considering extremes, evaluate web hosts based on their ROI: are they providing you with all the features you need (and maybe a few additional perks) at a reasonable price?
Once you do that, the second step is reading the fine print. Many web hosting providers offer a lower price in the first year and significantly raise the prices the next year. The solution? Evaluate renewal rates to ensure you’re making the right long-term choice.
While you are at it, also look at the “perks” like website backups — they might be free for the first year only. Check their cost at the time of renewal, and consider fees for backups, SSL certificates, and migrations. Look closely at all of these factors and add up the total price you’ll pay at the time of initial purchase, as well as renewal.
Many web hosting providers also offer a money-back guarantee, but exclude fees for additional services — like setup, migration, or domain registration — from this promise. Ensure you know this before you sign up for a web host so you know what you can get back and what you can’t.
Regarding billing options, many web hosts offer significant discounts on yearly or multi-year payments. Commit to a web host for multiple years if you’re confident they are the one you want.
If you’re signing up for numerous years with a web host, research their price increase history first. Many hosts might increase their prices too much compared to their competitors after a few years.
Tip: In addition to monthly and annual plans, WordPress.com offers options to pay every two or every three years. All annual and multi-year plans offer discounted pricing, even after renewal, so you can save money while knowing your site’s long-term home on the web is secured.
3. SecurityYour website is prone to viruses and malicious attacks if your web hosting provider doesn’t have strong security features. Here’s what you should look for:
Access controls to ensure no unauthorized person can access your IP address.Automatic website backups and updates.Firewall and malware protection.SSL certificates.Some security features — like SSL certificates — are standard across most web hosting providers. Many even offer it for free for the first year. If your website handles sensitive customer information or has significant traffic coming in, however, you need to go beyond the basics. Monitor the security features closely to ensure it matches what you need.
Tip: If you have chosen managed hosting via WordPress.com, for example, your website’s security and safety are fully accounted for. There’s brute-force protection to protect your account password, shield from DDoS attacks, automated malware removal, and a lot more. You can sleep peacefully knowing the security of your site is in good hands.
4. Speed and reliabilityYour website’s performance depends on uptime and load time. Your host dictates both of those things. Look for hosts that offer a high uptime guarantee — the industry standard is 99.9% uptime or higher. You can also check your terms and conditions to understand if your web host offers compensation for downtime.
Your site’s speed is affected by various factors. For starters, if you choose shared hosting, you share your resources with other customers, which means if other servers experience too much traffic, your site might slow down. Examine how your web hosting provider configures resources in a shared hosting plan.
You also want to look for web hosts with data centers close to your audience’s location to speed up loading times. Or you could choose a web host like WordPress.com that offers a global content delivery network (CDN) with 28+ edge locations already built in.
 Here is a look at Automattic’s global network of data centers (which power WordPress.com). You can see a live traffic map here.
Lastly, monitor other performance features such as SSD vs. HDD storage (SSD is faster), built-in caching mechanisms, and server response time.
Tip: WordPress.com offers 99.99% uptime (seriously). However, if your site does experience downtime (Business plan or above), you will get alerts the minute downtime is detected.
5. Storage and bandwidthStorage is how much data you can store on your server, including website files, images, videos, emails, backups, etc. How much storage you need is unique to your website and needs. For example, someone building a one-page website (like a portfolio) might not need a large amount of storage space, but a small business expanding rapidly might.
In shared hosting, some web hosts might list “unlimited” storage, but restrict the number of files you can store under fair usage policies. Make sure you read the clause details properly to know your storage limitations.
On other hosting types, you can customize the storage you need based on the various web hosting plans. For example, WordPress.com offers 13 GB of storage in its Premium plan, while our Business and Commerce plans start at a generous 50 GB (with the option to purchase more storage).
When monitoring hosting storage plans, check if you can increase your storage without downtime and whether there are any file type restrictions.
Bandwidth is the amount of data transferred between you and your visitors. The amount of bandwidth you need depends on your average page size, monthly visitors, page views, and unexpected traffic spikes. You can use a website bandwidth calculator to determine how much bandwidth you might need.
 Source
Some web hosts — like WordPress.com — offer unrestricted bandwidth. Others might slow down your site after you exceed a certain limit. A few also charge for stretching the bandwidth. Choose a web host that can comfortably meet your bandwidth needs not just today, but in the future.
6. Customer supportImagine you have an online store and your website is down for a few days. This isn’t just inconvenient, it’s revenue lost. Website issues are often urgent and need to be resolved quickly.
Choose a web host with reliable 24/7 support (in multiple formats), so you get the help you need instantly. Ideally, you’d want to look for live chat or phone support to get quick responses. However, you should also look at ticketing systems and promised resolution times to understand how quickly your web host will respond to larger issues that might arise.
It’s also worth checking out the support documentation of web hosting providers. Do they answer FAQs thoroughly? Do they have video guides for beginners? Is the knowledge base regularly updated? Would you be able to resolve many issues independently?
Some web hosts, however, don’t deliver on their promises. Check reviews from third-party sites like TrustPilot or G2 to understand if the web host lives up to their promises.
Tip: In addition to top-tier customer support, look for hosts that provide high-quality support documentation.
7. Ease of useThe control panel of your web hosting provider should be user-friendly. You should be able to navigate it and manage your database, emails, backups, etc. If you need assistance doing basic tasks, too, you may get frustrated and unnecessarily waste time opening your web host account.
This is, again, where an extensive knowledge library is invaluable. If your web hosting provider has laid out tutorials and blogs on building a website using their tool, you won’t be stuck trying to figure it out.
8. MigrationIf you are moving your site from another web hosting provider, check if your new one offers a free migration service. For instance, if you want to move your site to WordPress.com, we provide a free migration service.
You also want to check the process of moving your website. Is it easy to import your site files? Are there any risks of losing your data? How much time does the whole process take from start to finish?
Understanding the above before migrating your site to a new web host will help make the process smoother and risk-free.
9. Integration with CMS/website buildersMost popular web hosts offer integration with popular CMS platforms and website builders like WordPress and others. You want to choose a web host that connects seamlessly to your CMS or website builder.
Many web hosts — like WordPress.com — are fine-tuned for a specific CMS (like WordPress). CMS-specific hosting offers tailored support, automated updates, and CMS-specific firewalls.
10. Additional features (like custom email, domain name, etc.)Can you purchase your domain name, professional email address, and web host from different providers? Of course. Many web hosting companies, however, bundle them together and offer a discounted price, helping you save money and admin work.
For example, all WordPress.com sites get a free domain for one year. There are also other perks, like tons of Jetpack-powered features at no extra cost. Look at the various perks website hosts offer and choose the ones that make the most sense for you.
A web host is your site’s homeYour website host is your website’s home on the worldwide web — make the choice with careful consideration. You don’t want to pick a home that costs less but has a leaky roof.
If you don’t want the hassle of continually working to maintain your site, opt for managed hosting via WordPress.com. We ensure your website remains online, fast, and secure regardless of traffic spikes, so you can focus on growing your business on the internet carefree.
Tim McGiven's Blog

- Tim McGiven's profile
- 1 follower

