
My New Toy
For my birthday last week, Rohan decided to surprise me something absolutely extravagant: a Wacom Cintiq.
What is a Wacom Cintiq, you ask?
Basically, it's a huge (about the same size as a TV screen) tablet with an easel and a pen-cursor for the purpose of creating digital drawings and paintings. I've wanted one for a loooooong time. But didn't really feel like I deserved one since I'm not a real artist.
But my handsome husband felt otherwise. Because he's the sweetest like that.
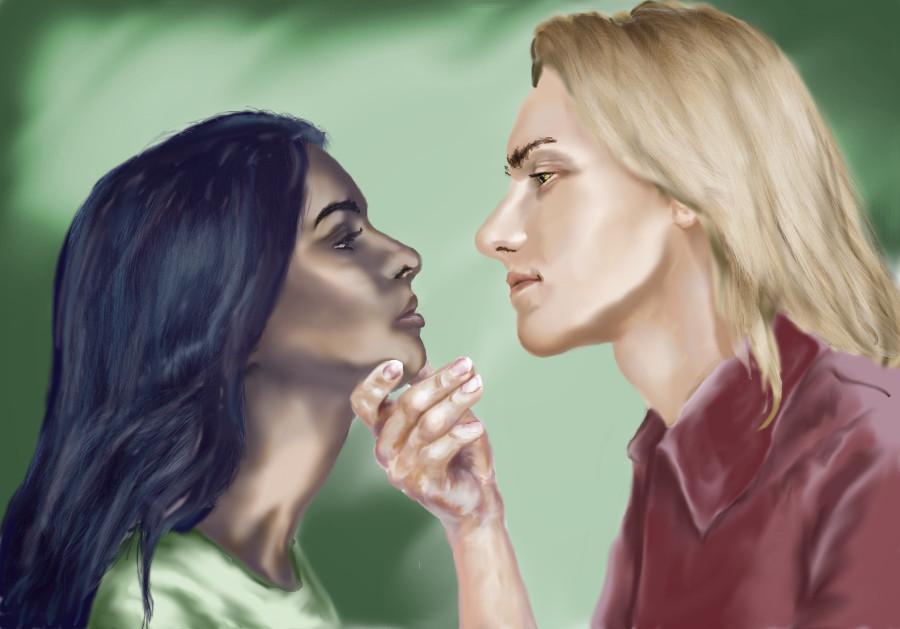
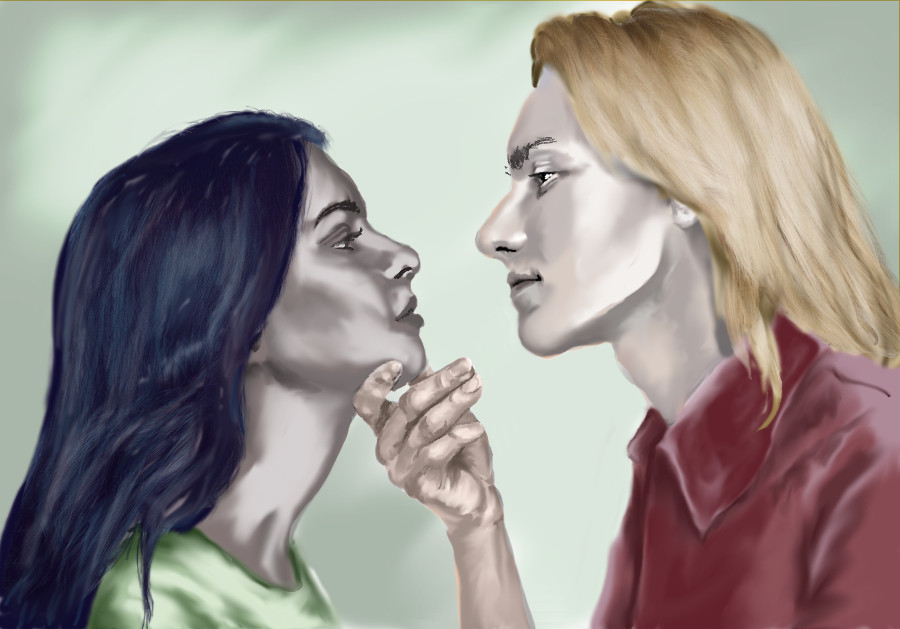
Anyway, I finally set it up and created my very first digital painting today! I LOVED how quick and easy it was to make! (By "quick" and "easy," I mean it only took my about 6 hours.) This first endeavor is pretty rough and very simple, but I hope it will give all of you a smile!
Recognize these two?

Don't look TOO closely at his hand, 'cause it will start looking a bit warped under close scrutiny! But still, considering I haven't actually sat down to an easel in nearly five years, I feel pretty good about this. Most basic drawing and painting techniques still apply, but the digital format allows for some pretty cool variations that make the whole process easier.
I'll probably add some cool details to this as I get more comfortable with these tools. Maybe some embroidered edging on shirt. And a starflower in her hair. We'll see . . . I'll post updates if I get around to them . . .
Anyway, I had a blast! And I can hardly wait to start my next painting!
EDIT:
I thought perhaps all of you would enjoy seeing a step-by-step of how I created this painting, since the process is, in some ways, more interesting than the result itself. And with digital painting it's SO easy to save the steps along the way! So here you go . . .
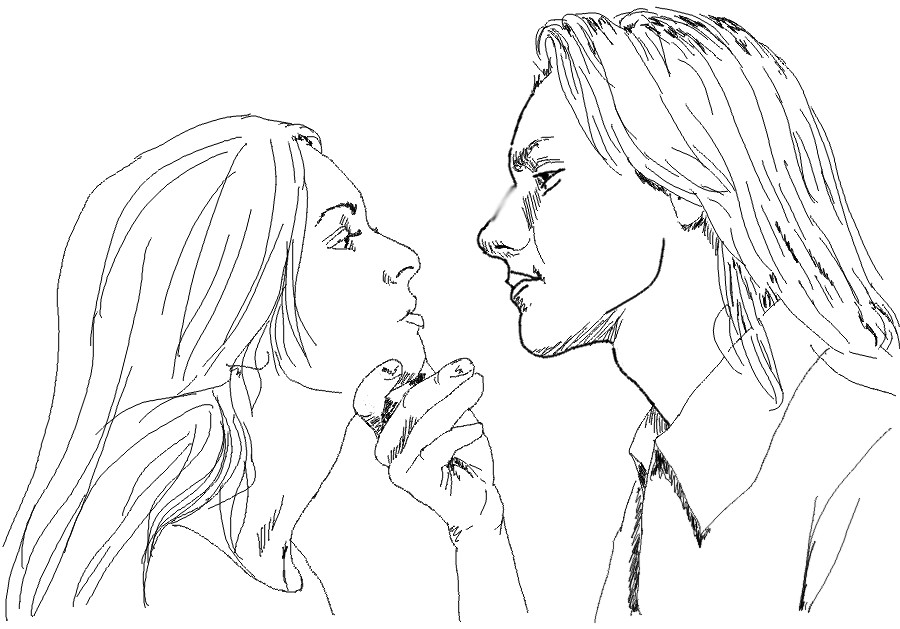
Step One: I roughly sketched my characters based on a photo reference. This sketch was done directly onto the screen (and you're seeing a refined version, rough though it is!). The original models had weird piercings, and the girl was not the right nationality, but those were simple enough fixes.

Step Two: I filled in very basic color blocking for hair and skin. Not really sure that this stage accomplished much other than just getting me comfortable with the characters, color schemes, and wielding my new tools! As you can see, I did not concern myself with "staying in the lines," but simply tidied up those edges later using my eraser tool.

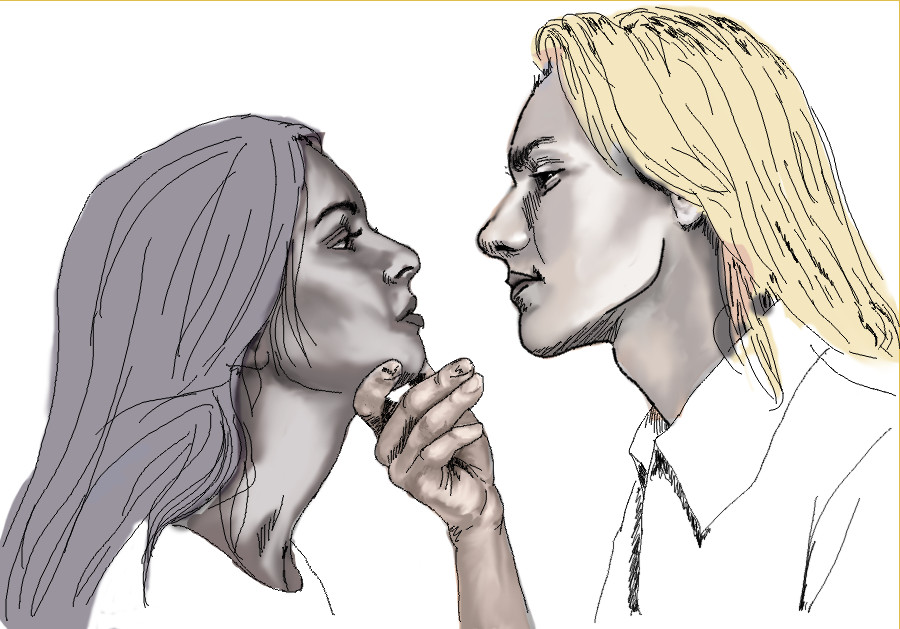
Step Three: Feeling utterly intimidated (!), I decided to apply all the shadows and dimensions to their skin in shades of gray. This way, I could focus on getting the right depth and dimension without concerning myself just yet with actual skin tones. (When I painted in acrylics way back in the day, I would do this stage in shades of green.) I left the original sketch layer on through much of this stage, just to give me one more visual guideline.

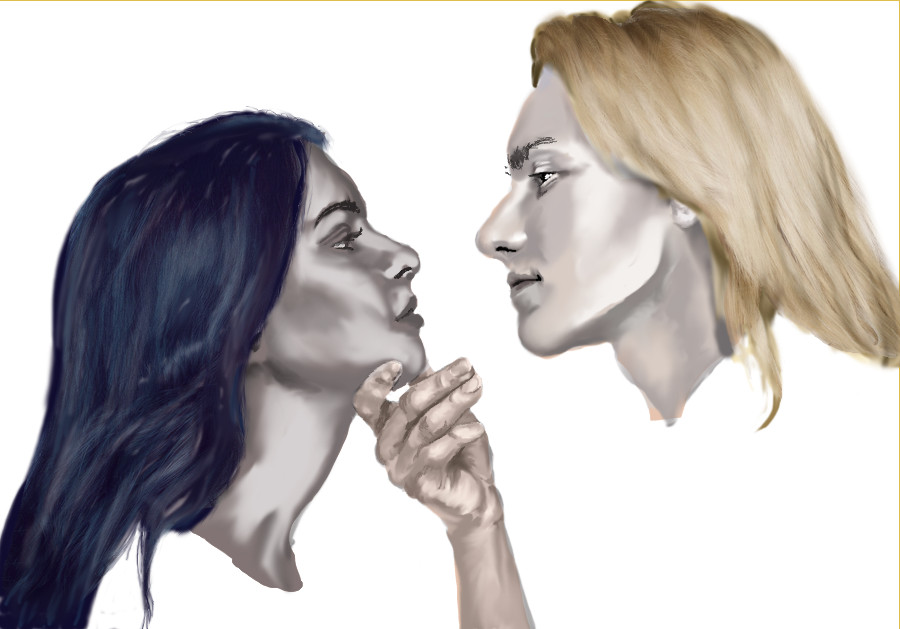
Step Four: After a tea break to clear my head, I came back to tackle their hair. Which wasn't so bad as I thought it would be! I built up layers of shadows and highlights until I had something that looked pretty much hair-like! Around this stage, I removed the sketch layers and started working primarily without it, too. They look a bit sickly with their gray complexions, but otherwise, they're coming along pretty nicely!

Step Five: Working very quickly, I blocked in an abstract background and their clothes. My interest has always been faces, not clothing, so I kept their garments pretty minimal. I MIGHT go back in and add some interesting trimming and embroidery later, now that I'm more comfortable with the tools. We'll see.

Step Six: All that remained now was transforming those robotic complexions into flesh-and-blood! This stage took quite a lot of patience and fine-tuning (particularly on the hand!), but I did it by simply applying transparent "washes" of color, building up the layers until I achieved the effects I wanted. This is the same technique I used back when I did fine-art portraits (I was specifically trained in this technique by my college mentor, Professor Davis, who recognized my love of all things classical, and therefore trained me in this classical, Renaissance style). So yes, same technique, but digital! So much quicker, much easier, with more immediate results. What would ordinarily have taken me several days, I managed to do in about an hour and a half!

Ta da!
I hope you had fun seeing this step-by-step process. It probably wasn't the most efficient ever, since I'm still getting used to this equipment. But it was a ton of fun!
But people and faces have always been my comfort zone. Next, I plan to tackle a tree, which is much harder for me. All those textures? All those leaves? Eeeeek! I probably won't post any more paintings for a while until I have some good results again . . .
What is a Wacom Cintiq, you ask?
Basically, it's a huge (about the same size as a TV screen) tablet with an easel and a pen-cursor for the purpose of creating digital drawings and paintings. I've wanted one for a loooooong time. But didn't really feel like I deserved one since I'm not a real artist.
But my handsome husband felt otherwise. Because he's the sweetest like that.
Anyway, I finally set it up and created my very first digital painting today! I LOVED how quick and easy it was to make! (By "quick" and "easy," I mean it only took my about 6 hours.) This first endeavor is pretty rough and very simple, but I hope it will give all of you a smile!
Recognize these two?
Don't look TOO closely at his hand, 'cause it will start looking a bit warped under close scrutiny! But still, considering I haven't actually sat down to an easel in nearly five years, I feel pretty good about this. Most basic drawing and painting techniques still apply, but the digital format allows for some pretty cool variations that make the whole process easier.
I'll probably add some cool details to this as I get more comfortable with these tools. Maybe some embroidered edging on shirt. And a starflower in her hair. We'll see . . . I'll post updates if I get around to them . . .
Anyway, I had a blast! And I can hardly wait to start my next painting!
EDIT:
I thought perhaps all of you would enjoy seeing a step-by-step of how I created this painting, since the process is, in some ways, more interesting than the result itself. And with digital painting it's SO easy to save the steps along the way! So here you go . . .
Step One: I roughly sketched my characters based on a photo reference. This sketch was done directly onto the screen (and you're seeing a refined version, rough though it is!). The original models had weird piercings, and the girl was not the right nationality, but those were simple enough fixes.
Step Two: I filled in very basic color blocking for hair and skin. Not really sure that this stage accomplished much other than just getting me comfortable with the characters, color schemes, and wielding my new tools! As you can see, I did not concern myself with "staying in the lines," but simply tidied up those edges later using my eraser tool.

Step Three: Feeling utterly intimidated (!), I decided to apply all the shadows and dimensions to their skin in shades of gray. This way, I could focus on getting the right depth and dimension without concerning myself just yet with actual skin tones. (When I painted in acrylics way back in the day, I would do this stage in shades of green.) I left the original sketch layer on through much of this stage, just to give me one more visual guideline.
Step Four: After a tea break to clear my head, I came back to tackle their hair. Which wasn't so bad as I thought it would be! I built up layers of shadows and highlights until I had something that looked pretty much hair-like! Around this stage, I removed the sketch layers and started working primarily without it, too. They look a bit sickly with their gray complexions, but otherwise, they're coming along pretty nicely!
Step Five: Working very quickly, I blocked in an abstract background and their clothes. My interest has always been faces, not clothing, so I kept their garments pretty minimal. I MIGHT go back in and add some interesting trimming and embroidery later, now that I'm more comfortable with the tools. We'll see.
Step Six: All that remained now was transforming those robotic complexions into flesh-and-blood! This stage took quite a lot of patience and fine-tuning (particularly on the hand!), but I did it by simply applying transparent "washes" of color, building up the layers until I achieved the effects I wanted. This is the same technique I used back when I did fine-art portraits (I was specifically trained in this technique by my college mentor, Professor Davis, who recognized my love of all things classical, and therefore trained me in this classical, Renaissance style). So yes, same technique, but digital! So much quicker, much easier, with more immediate results. What would ordinarily have taken me several days, I managed to do in about an hour and a half!

Ta da!
I hope you had fun seeing this step-by-step process. It probably wasn't the most efficient ever, since I'm still getting used to this equipment. But it was a ton of fun!
But people and faces have always been my comfort zone. Next, I plan to tackle a tree, which is much harder for me. All those textures? All those leaves? Eeeeek! I probably won't post any more paintings for a while until I have some good results again . . .


No comments have been added yet.


